
🩷| 0.0.9 |🩷
Welcome to olive! Olive is a pure julia notebook editor built on the back of multiple dispatch. Through multiple dispatch, olive is able to change functionality entirely by simply having new methods. Using extensions, olive can edit any file. Among other things, olive features ...
- regular julia modules
- unparalleled extensibility
- modular design
- tabbing notebooks
- its own julia ecosystem
- customizable settings
- reading of pluto, julia, olive, and ipython notebooks
- exporting to multiple formats
- a full file-browser
- julia repl cells
- module and include cells for software development
- deployability
- shared variables between multiple cell-types
- a two-pane design
- loadable directories as profiles
- flexible and modern design
- the ability to edit any file
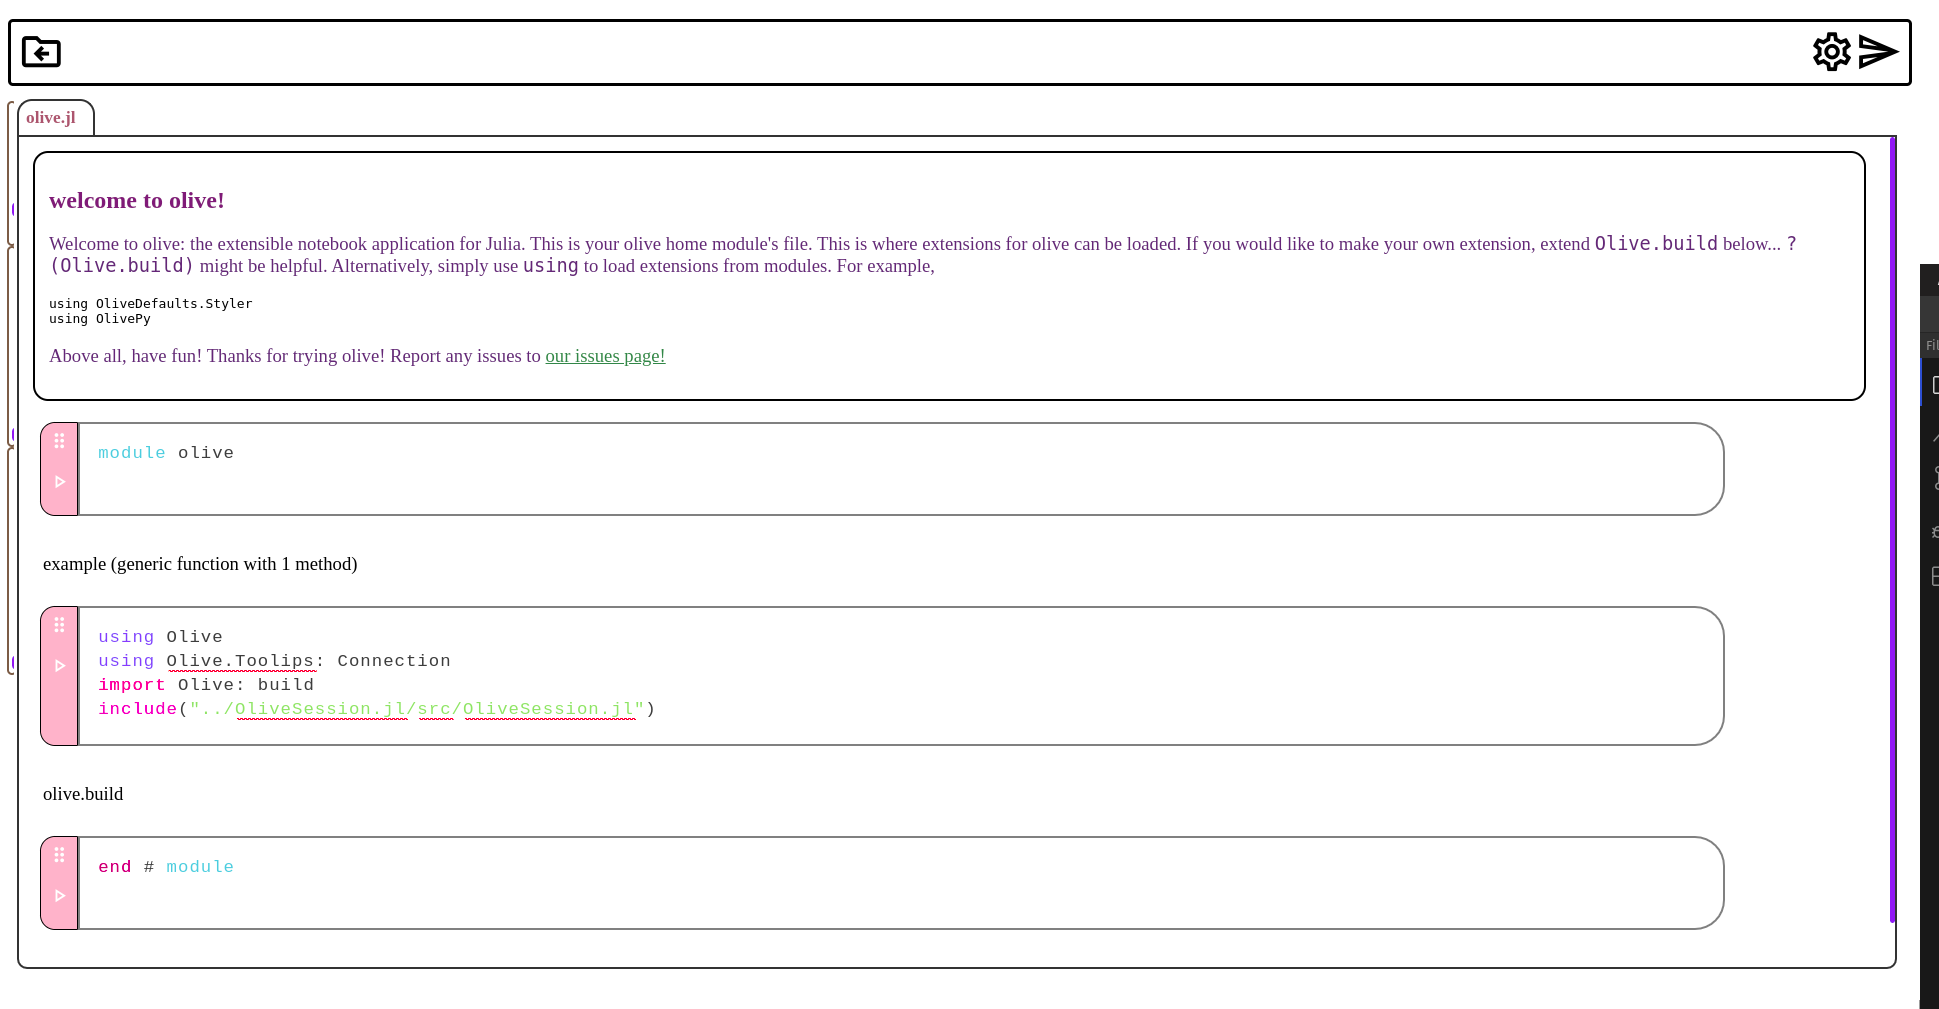

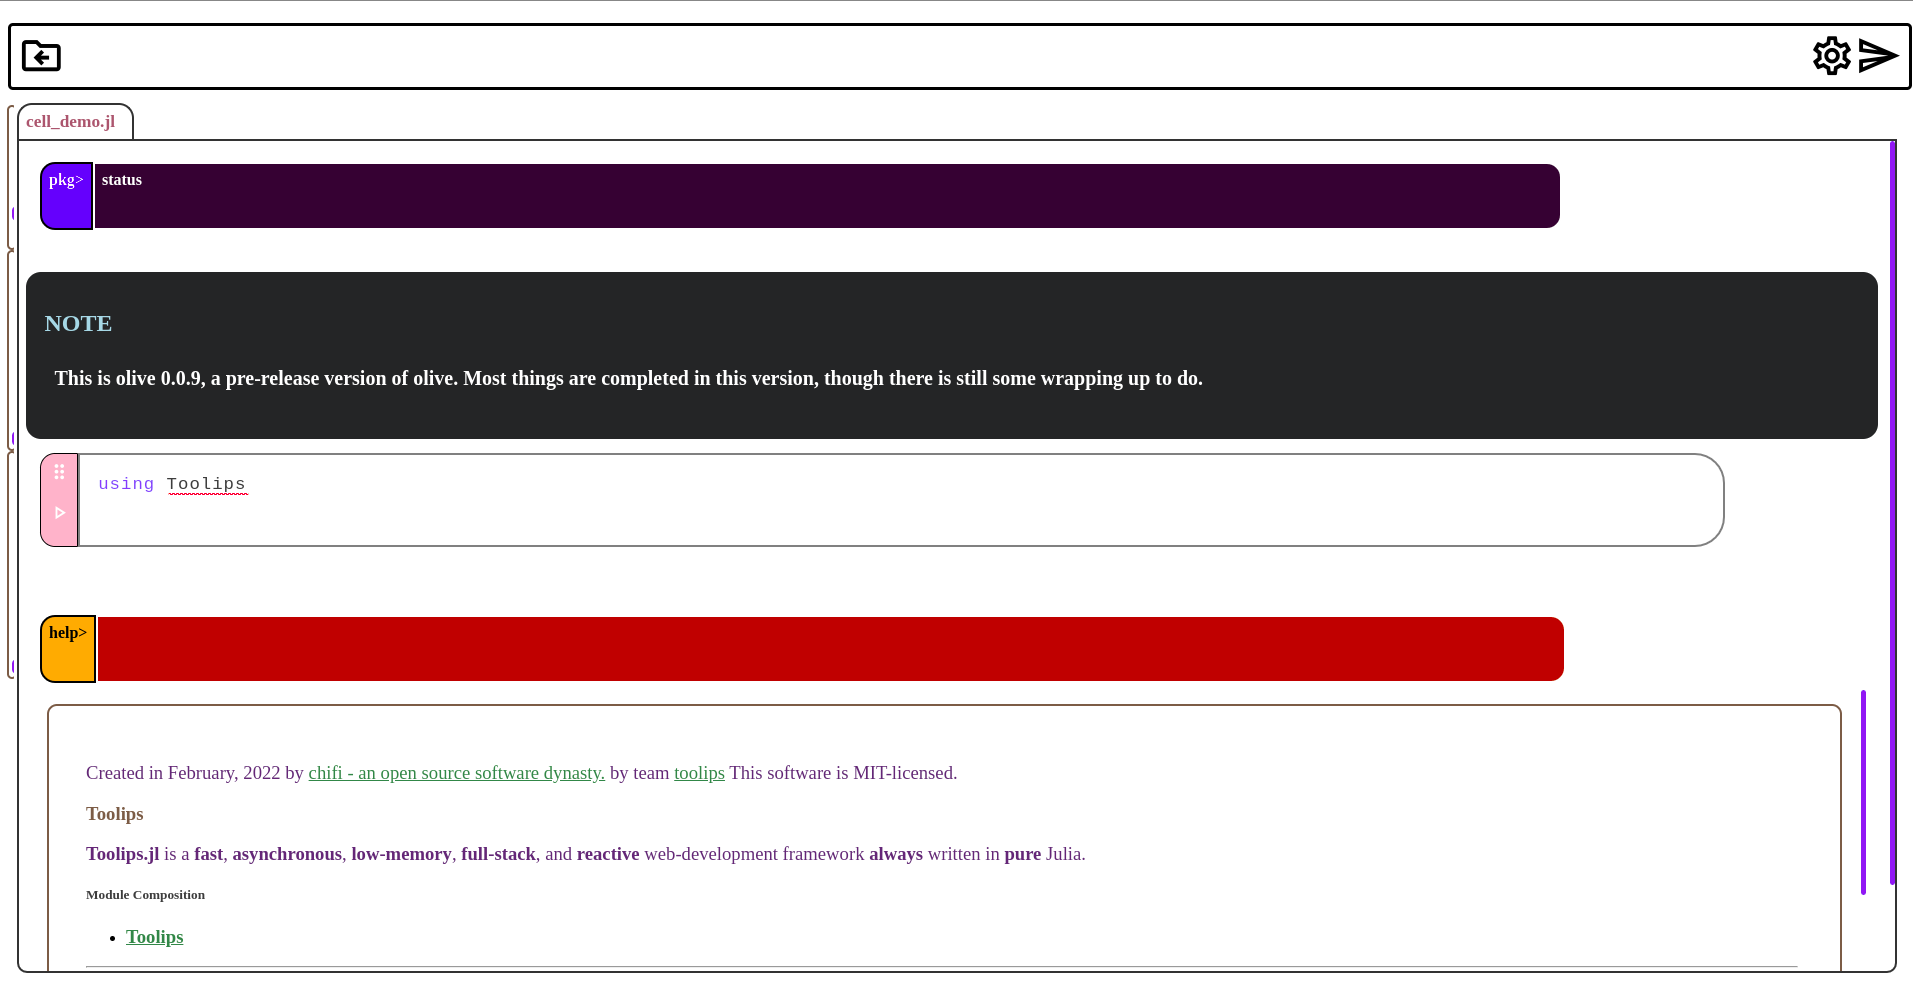
Keep in mind this version of Olive (while functional) is still a work in progress build. Thank you for reporting bugs to the issues page!
map
- get started
- extensions
- deploying olive
- contributing
get started
- this overview corresponds to
Olive0.0.9, subsequent versions may vary slightly.
Getting started with Olive starts by installing this package via Pkg. Press ] to enter your pkg REPL.
julia> using Pkg; Pkg.add("Olive")
julia> ]

pkg> add Olive
Alternatively, you could also grab Unstable, this will give you the latest developments (0.0.9), but some features might be intermittently broken.
julia> ]
pkg> add Olive#Unstable
Next, use Olive.start():
using Olive; Olive.start()
This should provide you with a link to get started with Olive!
To change the IP or PORT, use the positional arguments IP (1, String) and PORT (2, Int64). There are also the key-word arguments
path::String =homedirec()free::Bool =falsedevmode::Bool =false
IP = "127.0.0.1" # same as default (see ?(Olive.start))
PORT = 8000
startpath = "/home/dev/notebooks"
using Olive

Olive.start(IP, PORT, devmode = false, path = startpath)
Providing devmode as true will start Olive in developer mode. This just makes it easier to test things when working on Olive itself. More will eventually come to devmode, as of right now this option will simply disable authentication. Providing a path will search for an olive home at the provided directory. If there is no olive directory, this will start the setup inside of this directory. This can be useful for developing extensions, deploying olive, or having multiple profiles with different sets of extensions. Providing free as true will start the Olive server in global mode. This means that instead of using an olive home file, olive will use your default Julia environment.
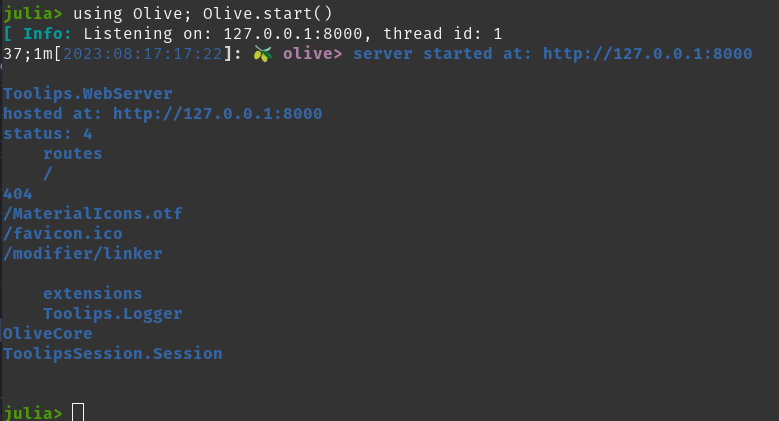
The Olive.start method also returns a Toolips.WebServer, this being the server that contains your entire Olive session. This provides an easy avenue to introspect and work with Olive, especially if you know what you are doing. There is more information on working with this server type in the olive servers portion of this README.
setup

When you start Olive for the first time, you will be greeted with a new link to your olive setup. This screen also holds a directory selector. The currently selected directory is indicated by the label at the top. In this directory, a new Julia project will be created. This will be your olive home environment. This includes the folder olive, the Project.toml environment and its Manifest.toml counter-part, the contained src directory and corresponding source file src/olive.jl. After selecting a directory, the setup will then move to a second screen.
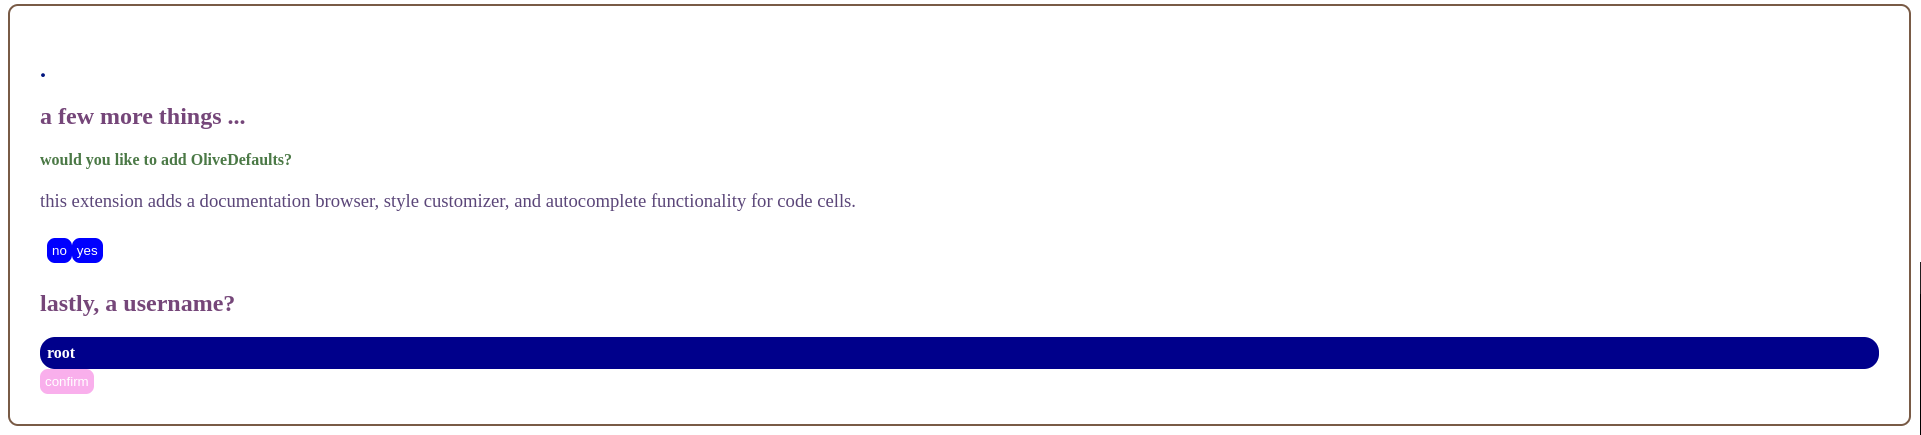
This portion of the setup will ask for a name and if you want to add OliveDefaults. This package provides Olive with some default extensions that many developers would likely prefer. This includes
- The
Stylerextension. - The
DocBrowserextension. - The
AutoCompleteextension - And the
Themesextension.
These extensions can be loaded individually; the setup will only add OliveDefaults with Pkg. The name is also pretty important, though certainly not necessary. Any name will work, including the default root. After pressing continue, a loadbar will appear and Olive will begin setting up your olive environment. After this loadbar finishes (so long as the setup completes successfully), you will be redirected to a new Olive session!
documentation
With the upcoming release of 0.1.0, chifi will also be releasing OliveCreator, this will be a website which hosts Olive. Along with this there will be interactive examples, notebooks, and most importantly -- documentation (for all chifi stuff, really awesome olive-based documentation). The problem is that this still requires a lot of work to Olive and its sister projects. In its current state the two best tools to learn Olive are
-
this
README -
or the OliveDefaults documentation browser.
I would recommend the latter. For the most part, this documentation is only needed if you are writing extensions for
Olive. I could see knowledge of how the thing works being beneficial in these early pre-releases, however. In other instances, thisREADMEshould suffice.
user interface
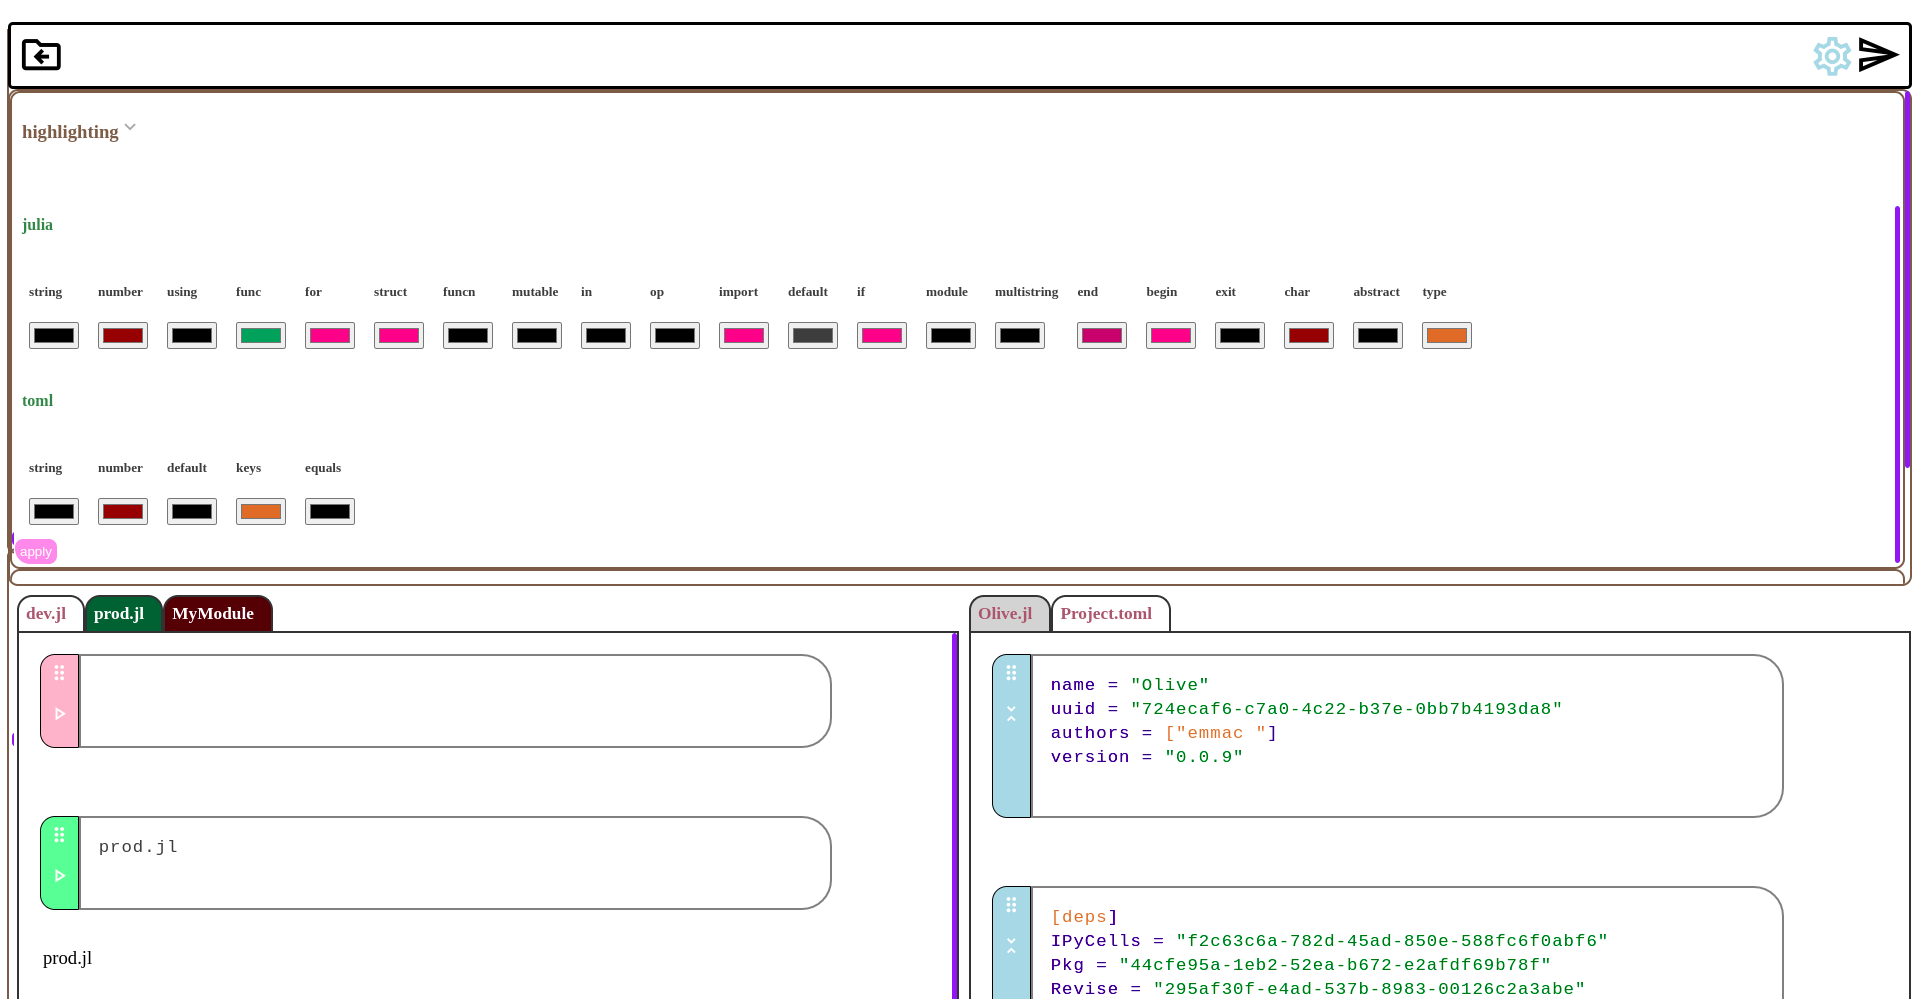
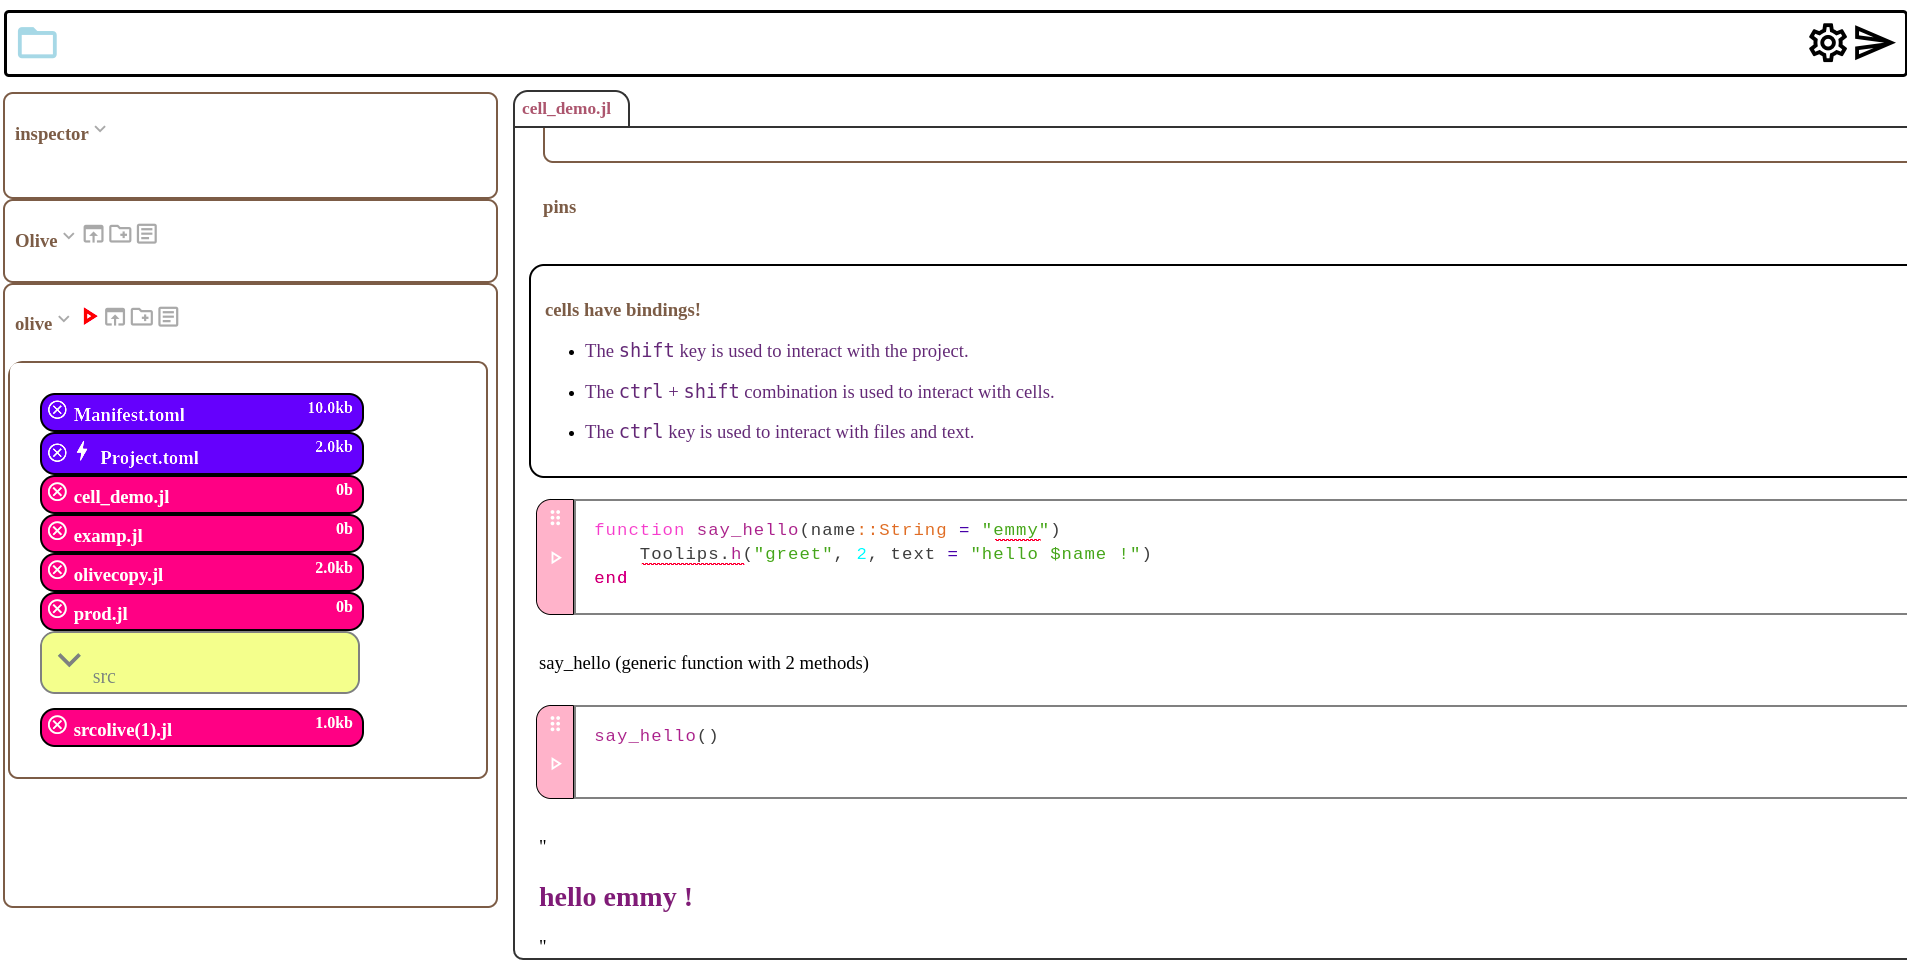
Olive's user-interface is relatively straightforward. When starting olive, you will be greeted with a get started Project. A Project in Olive is represented by a tab and the project's cells. This consumes the majority of the UI. These projects are contained within two separate panes, the left pane and the right pane respectively. The left pane can be open without the right pane, but the right pane cannot be open without the left pane. The project can be switched using the pane switcher button on the top of the project. At the top of the window will be the topbar. The topbar has two buttons on it, on the left this is a folder with an arrow. Clicking this button will open the project explorer. This is the menu to the left of your Olive session. At the top of this menu, there is the inspector, and below this is where every Directory is placed. When a Project is added to the session, it will also add a preview into the inspector. In the top right there is a cog, this button will reveal the settings menu. All settings in Olive are added via extensions, so these will be your extension settings, such as key-bindings and syntax highlighting. Adding more extensions will often add new settings to this menu.
The main window is called session. This contains two panes which will be filled with your projects. Projects are denoted by a tab and a window which contains cells. This tab can be double clicked for a range of different project options.
topbar
The top bar is responsible for holding extension controls, settings, and the project explorer. These can be accessed by simply clicking the corresponding icons. Inside of the settings there will be an editable configuration for all of the loaded Olive extensions. Inside of the project explorer is access to file operations and the inspector. The top bar is composed of three main sections: leftmenu, rightmenu and centermenu. These sections are where some types of extensions may appear. With this, the topbar becomes the main control for Olive. From here we access both files to edit and our Olive settings.
session
Session is the colloquial name for the main editor which comprises Olive -- this being the Project and Cell combination. Inside of session there are two panes, pane_one and pane_two respectively. These panes houses projects, their tabs being contained within a tab container above them. Clicking these tabs will yield project focus. Double clicking will add the tab's controls to the tab. These are, from left to right, decollapse controls, new cell, switch pane, re-source,step evaluate, and close project. Other than this, the hotkeys in keybindings are the primary method Olive uses for input. Files are open from the project explorer and then edited inside of this session, before being saved via ctrl + S or the inspector.
project explorer
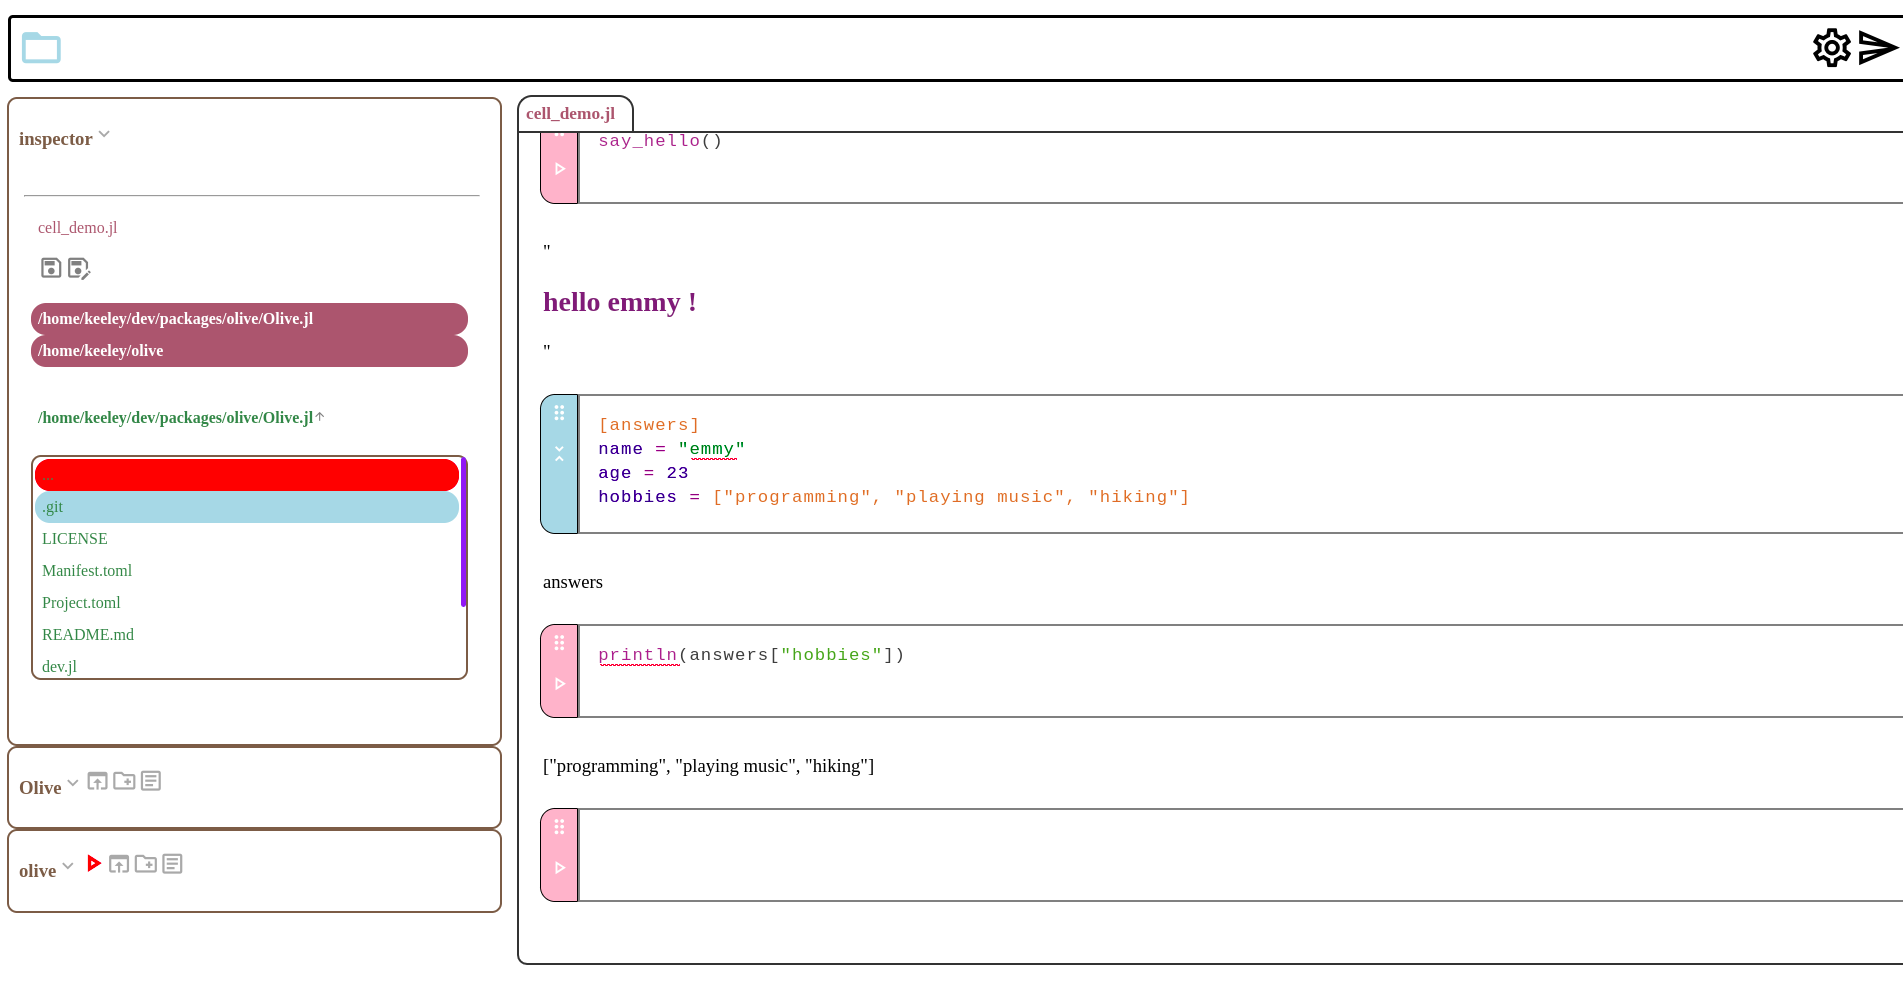
The project explorer is a crucial component to your Olive session because it manages the entire underlying filesystem running in your Environment. At the top of the project explorer will be the inspector. Once expanded, this section contains a file browser and previews of directories and projects in your Environment currently. Beneath this are the currently loaded directories. New directories can be added from the inspector by clicking the arrow next to the current working directory. Once added, we can open files from a given directory by double clicking.

This will also be where other file operations take place, such as save as and create file. Below this will be your directories with file cells inside. On the top, there is a button to update the Directory and a button to cd to the directory. If this directory is your olive home root, this is added if the client is root, then there will also be a red run button, this button sources your olive home module. Whenever a new file is created, our directory will not be updated until we hit the refresh button. All file creation happens through the inspector inside of the project explorer. After creating the file in an added Directory, refresh the Directory to open the file in Olive. The file cells inside of your directories are the main way Olive interacts with files aside from the file browser in the inspector. In order to update our directory with new file changes, we will need to hit its refresh button.

keybindings
<img
Using cells is simple. By default, olive bindings use ctrl alone for window features, ctrl + shift to do things inside of Cell, and shift to work with the Project. Here is the keymap reflecting this:
-
window bindings
ctrl+Ccopyctrl+Xcutctrl+Vpastectrl+Ssave selected projectctrl+zundoctrl+yredoctrl+FsearchTODO (but has default)ctrl+OopenTODOctrl+NnewTODO
-
project bindings
ctrl+shift+Ccopy selected cellTODOctrl+shift+Xcut selected cellTODOctrl+shift+Vpaste selected cellTODOctrl+Shift+Ssave project asctrl+shift+Deletedelete selected cellctrl+shift+Enternew cellctrl+shift+↑move selected cell upctrl+shift+↓move selected cell downctrl+shift+OopenTODO
-
cell bindings
shift+Enterrun cellshift+↑shift focus upshift+↑shift focus down
These keybindings can be edited inside of the settings
settings
The final component of the Olive UI we might want to familiarize ourselves with is the settings menu. Using load extensions, everything in Olive becomes a customizable setting. This menu is pretty straightforward, press the cog in the top bar to open or close the settings. Settings are organized into different menus by extension. These menus can be collapsed and decollapsed and contain editable settings for Olive. Note that in some cases, the page may need to be refreshed for new settings to be applied. There are more nuanced examples to this, as well. For example, changing your highlighter's style will yield no changes until a cell is typed into (or another cell is built.) Changing the key-bindings will only apply to newly built cells.
parametric methodology
Olive uses parameters and multiple dispatch to load new features with the creation of method definitions. This technique is used comprehensively for Olive's Directory and Project types, as well as IPyCell's Cell. This allows for a Symbol to be provided as a parameter. With this, Olive either reads the methods for its own functions or provides them as arguments to alter the nature of UI components. Project, Directory, and Cell are all julia types. These are translated into the Olive web-based UI using build methods. For example, the creator cell will list out all of the methods that Olive has defined for build(::Toolips.AbstractConnection, ::Toolips.Modifier, ::Cell{<:Any}, ::Vector{Cell}, proj::Project{<:Any}). In order to name such a cell, simply label the parameter in the Cell using a Symbol.

This is the defining characteristic of Olive, and also how the base Olive features are built. This is why Olive is a multiple dispatch notebook, not just that but a parametric multiple dispatch notebook. As a result, a lot of what Projects, Cells, and Directories do is pretty open-ended -- anything is possible. This is also how extensions for Olive work. While this might not be that important to know if you are not extending Olive on your own, it is helpful to know this going into Olive and the rest of this README.
extensions
Olive is not Olive without extensions. While the base Olive features are pretty cool, Olive's base is intentionally built with a minimalist mindset. The idea is that nothing is everyone's cup of tea, so why use someone else's computer to load things for people who do not even want those things to begin with? With the Olive (and frankly, Julia) approach new features are added by adding new methods to existing Olive functions. With this, Olive becomes a notebook centralized on multiple dispatch! Olive extensions work off of Olive's parametric multiple dispatch methodology for loading extensions. A parameter is used to denote the existence of a new function, and each method of a given function becomes representative of that cell's action.
installing extensions
As a result of this design choice, extensions are loaded by merely having such method definitions loaded into memory. As a result, installing extensions is incredibly easy. The first step is to add the package, for this example we will be adding OliveDefaults. This module provides some pretty awesome default things many users might want for an editor like this -- AutoComplete, Themes, DocBrowser, and some other useful things. We can add this package with Pkg in the REPL or through Olive. If you are root, the active olive home directory will be added to the project explorer initially. From here, we could either use a separate file or use our olive.jl home file. Inside of this file, we may create a new pkgrepl cell with ctrl + shift + Enter then ].

This works like a normal Julia REPL. This may also be done through the julia REPL. After this package is added, we need to add using to our source file. In some cases, an Olive extension might consist of multiple modules. This is the case with OliveDefaults, which means that we can grab each extension individually as we want it by merely using imports... For example, I only want the documentation browser:
using OliveDefaults: DocBrowser

Now we simply save this. The olive directory has a run button that is used to resource the module. Press this button, if you do not get an error message (which means there is an error in your code, or with Olive forming a module with your code) you have installed the extension. There should be an Olive notification that drops down and denotes the success of the operation.
Extensions for Olive can be as small as an icon, or as large as a new programming language loaded from a new file format. Olive can edit anything however it wants to with the only limitation really being Toolips and the web itself -- it's great!
common extensions`
note that a lot of extensions for Olive are waiting on this initial 0.0.9 (if this is on master it is here) release to be released. That being said, there might not be that much done yet depending on when this is being read. There is a full list of chifi-made extensions here
creating extensions
As has been touched on quite extensively in this README, Olive loads extensions by checking for new methods of its functions. There are several different types of extensions that can be created for Olive, so let's get familiar with the what each function is for. The most essential function on this front is the build function. Though Olive is written in one language with both frontend and backend under the same hood, it is still written with a frontend and a backend. The only thing that is different on that front is that the translation between the two is done seemlessly through Toolips' API. This build function is used to translate the Julia objects from the backend into GUI interface components. In fact we may view all of the functions for our cells by calling methods on it.
julia> using Olive; import Olive: build
🩷
julia> methods(Olive.build)
# 26 methods for generic function "build" from Olive:
  [1] build(c::Toolips.AbstractConnection, cm::ComponentModifier, p::Olive.Project)
     @ ~/dev/packages/olive/Olive.jl/src/Core.jl:507
  [2] build(c::Connection, dir::Olive.Directory, m::Module)
     @ ~/dev/packages/olive/Olive.jl/src/Core.jl:360
  [3] build(c::Connection, cell::Cell{:ipynb}, d::Olive.Directory)
     @ ~/dev/packages/olive/Olive.jl/src/Cells.jl:368
  [4] build(c::Connection, cell::Cell{:setup})
     @ ~/dev/packages/olive/Olive.jl/src/Cells.jl:1716
  [5] build(c::Connection, cell::Cell{:dir}, d::Olive.Directory)
     @ ~/dev/packages/olive/Olive.jl/src/Cells.jl:334
  [6] build(c::Connection, cm::ComponentModifier, cell::Cell{:markdown}, proj::Olive.Project)
     @ ~/dev/packages/olive/Olive.jl/src/Cells.jl:930
...
 [18] build(c::Connection, cm::ComponentModifier, cell::Cell, proj::Olive.Project)
     @ ~/dev/packages/olive/Olive.jl/src/Cells.jl:506
 [19] build(c::Connection, om::OliveModifier, oe::OliveExtension{:highlightstyler})
     @ ~/dev/packages/olive/Olive.jl/src/Core.jl:220
 [20] build(c::Connection, om::OliveModifier, oe::OliveExtension{:creatorkeys})
     @ ~/dev/packages/olive/Olive.jl/src/Core.jl:157
 [21] build(c::Connection, om::OliveModifier, oe::OliveExtension{:keybinds})
     @ ~/dev/packages/olive/Olive.jl/src/Core.jl:99
Here we begin to see the different dispatches and what they do. The first method listed above is the build function for Project{<:Any}. This creates the regular projects that we are used to seeing inside of Olive that we are used to seeing, with the tab on top. The function responsible for creating these tabs is actually build_tab, just for fun let's look at the methods...
julia> methods(Olive.build_tab)
# 3 methods for generic function "build_tab" from Olive:
 [1] build_tab(c::Connection, p::Olive.Project{:include}; hidden)
     @ ~/dev/packages/olive/Olive.jl/src/UI.jl:702
 [2] build_tab(c::Connection, p::Olive.Project{:module}; hidden)
     @ ~/dev/packages/olive/Olive.jl/src/UI.jl:733
 [3] build_tab(c::Connection, p::Olive.Project; hidden)
     @ ~/dev/packages/olive/Olive.jl/src/UI.jl:763
Below this, # 2 is the Directory, then is the ipynb file cell. Notice how the parameter is dispatched to ipynb, this symbolic representation denotes the existence of this cell. We also see that yes -- even Olive's key-bindings are loaded in as an extension using this method. The build function is one that transcends across most Olive types, not every function is this complicated or has this many methods. There are several different types of extensions we might want to write...
- load extensions
codecell extensionsDirectoryextensionsCellextensionsProjectextensions
Creating extensions will require two prerequisites from the creator. Firstly, there will need to be knowledge of these dispatches and what they do and secondly familiarity with toolips. Toolips is the web-development framework used to build Olive.
toolips basics
The most essential package to understand in order to work with Olive is toolips. This is the web-development used to turn Olive's backend into a user-friendly UI. In this README, we will go through a very basic overview of how to use Toolips. Here are some other links to help get familiar with different aspects of toolips:
Toolips is really easy to get started with from an Olive perspective because the only goal is composing Toolips.Components. For the purposes of developing an Olive extension, we are also able to use Toolips straight from Olive.
using Olive
using Olive.Toolips
using Olive.ToolipsSession
using Olive.ToolipsMarkdown
using Olive.ToolipsDefaults
components
The first thing we will need to broadly understand about toolips is the Component. If we are building webpages and documents, as we are with Olive and Olive extensions, we are going to be writing most things to the Connection through a Component. In toolips, the Component is a regular HTML element. We mutate these components by changing their style with style!, as well as creating CSS stylesheets with Style, and changing their arguments. For example, try running the following in Olive:
using Olive.Toolips
mydiv = div("newdiv", contenteditable = true)
style!(mydiv, "border" => "2px solid pink", "border-radius" => 5px)
A Component is constructed with a name and arguments, the one exception being h, which takes an Integer (heading level) as the second positional argument, after the name.
myheading = h("myheading", 2, text = "example heading")
These functions, h and div are simply their HTML equivalents being constructed as a Component. For example, div returns a Component{:div}.
typeof(div("container"))

`Toolips.Component{:div}`
Arguments are able to be provided to these constructors in both Pair{String, String} and key-word argument form. Finally, we are able to compose Components together using the push! function.
push!(mydiv, myheading)
This pushes the children into one of two special Symbol tags, :text and :children. :text hold's the element's text, whereas :children holds all of the elements pushed into the Component. Components are written to a Connection using write!. The typical Toolips workflow involves composing Components into a body and then writing them to the Connection.
main = route("/") do c::Connection
    mainbod::Component{:body} = body("mainbod")
    style!(mainbod, "padding" => 200px)
    maindiv::Component{:div} = div("maindiv")
    style!(maindiv, "border" => "5px solid gray", "background-color" => "darkpurple", "padding" => 8px)
    askforname::Component{:h2} = h("askfor", 2, text = "what's your name friend?")
    style!(askforname, "color" => "white")
    namebox::Component{:div} = div("newnamebox", contenteditable = true, text = "")
    style!(namebox, "background-color" => "white", "color" => "darkgray")
    push!(maindiv, askforname, namebox)
    push!(mainbod, maindiv)
    write!(c, mainbod)
end
This is the HTML templating portion of Toolips. For Olive, there is no need to write anything through the Connection, as everything is done through callbacks.
callbacks
Callbacks are a feature added to toolips using ToolipsSession
routing and servers
Though this brief toolips overview is not targeted at creating your own server, it is worth going over the basics of routing and servers. This knowledge is also helpful for writing Olive extensions which extend beyond simple cells or otherwise. It is entirely possible to create your own Olive route and load it into an Olive server, for example. In Toolips, a ToolipsServer holds a server's data and routes incoming Connection. Extensions are loaded into a ToolipsServer by providing them in a Vector. In most cases, the server used in this context will be a Toolips.WebServer. Olive uses one server extension, ToolipsSession. This is the fullstack extension for Olive.
The extensions and routes are provided to a WebServer constructor pretty easily, like so:
using Toolips
using ToolipsSession

main = route("/") do c::Connection
    mainbod::Component{:body} = body("mainbod")
    style!(mainbod, "padding" => 200px)
    maindiv::Component{:div} = div("maindiv")
    style!(maindiv, "border" => "5px solid gray", "background-color" => "darkpurple", "padding" => 8px)
    askforname::Component{:h2} = h("askfor", 2, text = "what's your name friend?")
    style!(askforname, "color" => "white")
    namebox::Component{:div} = div("newnamebox", contenteditable = true, text = "")
    style!(namebox, "background-color" => "white", "color" => "darkgray")
    push!(maindiv, askforname, namebox)
    push!(mainbod, maindiv)
    write!(c, mainbod)
end
extens = [Session("/")]
ws = WebServer(extensions = extens, routes = rts)
With Olive, the main function is called session, and is able to be called with key-word arguments. For example,
using Olive
using Olive.Toolips
using Olive.ToolipsSession
newroute = route("/") do c::Connection
    Olive.session(c, key = false)
end
This is useful, sometimes, defining a route as a function -- and in this context it allows us to deconstruct or reconstruct Olive to our choosing. Consider the following example, for which the prerequesite knowledge is knowing the basics of Toolips and the basics of Olive.
main = route("/") do c::Connection
    mainbod::Component{:body} = body("mainbod")
    style!(mainbod, "padding" => 200px)
    maindiv::Component{:div} = div("maindiv")
    style!(maindiv, "border" => "5px solid gray", "background-color" => "darkpurple", "padding" => 8px)
    askforname::Component{:h2} = h("askfor", 2, text = "what's your name friend?")
    style!(askforname, "color" => "white")
    namebox::Component{:div} = div("newnamebox", contenteditable = true, text = "")
    style!(namebox, "background-color" => "white", "color" => "darkgray")
    push!(maindiv, askforname, namebox)
    push!(mainbod, maindiv)
    write!(c, mainbod)
end

session_pre = route("/") do c::Connection
    if getip(c) in keys(c[:OliveCore].names)
        Olive.session(c)
        return
    end
    main(c)
end
development environment
There is no one way to develop extensions for Olive. Extensions can be developed both inside of Olive and outside of Olive. The root user will be provided with the olive home directory, which has a red run button on it. Clicking this will load the extensions contained in olive.jl. The best workflow for this is probably to create a new olive home using the path key-word argument. There are usage instructions for this argument in get started. After which till generate a new Olive directory. This is helpful to not break or alter your home olive while developing extensions.
using Olive; Olive.start(path = "~/dev/olive_extensions")
Within this now, in this same path we generate our Olive extension.
cd("~/dev/olive_extensions")
using Pkg; Pkg.generate("MyOliveExtension")
Now we will activate our olive environment and develop the project. Use ] to enter the Pkg REPL from the Julia REPL, or ctrl + shift + Enter then ] in Olive.
julia> ]
pkg> activate olive
pkg> dev ./MyOliveExtension
Now with this extension loaded into the environment, we just need to add using to our olive home file.
load extensions
Load extensions are the most basic form of Olive extension. These are extensions that are used whenever Olive loads up. In base Olive, load extensions are primarily used to add settings to the setting menu. For any UI component that you want to add that is not already in Olive, however, this is how it is done. Creating a load extension is really easy with the prerequesite toolips knowledge. The only dispatch for these extensions is
build(c::Connection, om::OliveModifier, oe::OliveExtension{<:Any})
In order to create a new extension, we simply import and add a Method.
using Olive
import Olive: build

function build(c::Connection, om::OliveModifier, oe::OliveExtension{:example})

end
For this example, I will use the Olive.olive_notfiy! function. There are a lot of different functions which work off of the Connection and a ComponentModifier, like the OliveModifier. Some of these functions come from Olive and others come from the various toolips extensions which support this project. For a reference of Olive's functions for this, please refer to important functions.
using Olive
import Olive: build

build(c::Olive.Toolips.Connection, om::Olive.OliveModifier, oe::Olive.OliveExtension{:myextension}) = begin
    Olive.olive_notify!(om, "hello!")
end

Now if we save and source our olive home module, refreshing the page will yield our notification! The common workflow for this is to design components and then insert them into the editor. For a reference on where to insert, refer to the UI reference. Olive's dedicated area for these types of extensions is usually designated to topbar icons. This is done by using the append! method on your Component to put it into one of the menus. The most common type of element this will be is a topbar icon, so let's do an extension using that. Refer to the function reference important functions for a full list of default UI component functions within Olive.
The first thing I am going to do for this is set my working directory to my olive/src directory. Setting your working directory is done by navigating the inspector's file browser. From the inspector, I will select the file button under create. This will initiate the naming of my new file. I will name this OliveExtension.jl
code cell extensions
A very approachable form of Olive extensions are code cell extensions. These are extensions that extend the capabilities of Olive's base code cell. There are three different ways that we can extend the code cell:
- run the function on evaluation with
on_code_evaluate - run the function each time the cell is typed into with
on_code_highlight - run the function when the cell is created with
on_code_build.
on_code_evaluate(c::Connection, cm::ComponentModifier, oe::OliveExtension{<:Any}, cell::Cell{:code}, proj::Project{<:Any})

on_code_highlight(c::Connection, cm::ComponentModifier, oe::OliveExtension{<:Any}, cell::Cell{:code}, proj::Project{<:Any})

on_code_build(c::Connection, cm::ComponentModifier, oe::OliveExtension{<:Any}, cell::Cell{:code}, proj::Project{<:Any}, builtcell::Component{:div})
In order to make a new :code cell extension, we simply rename OliveExtension's parameter in a new dispatch.
import Olive: on_code_evaluate, on_code_highlight, on_code_build

function on_code_evaluate(c::Olive.Toolips.Connection, cm::Olive.ToolipsSession.ComponentModifier, oe::Olive.OliveExtension{:myeval},
 cell::Cell{:code}, proj::Olive.Project{<:Any})
    Olive.olive_notify!(cm, "hello")
end
Now everytime a cell is evaluated, we will receive a " hello" message. The inlets for this are clear -- for example, if I wanted to make a word suggestor I would check the current word on_code_highlight. Likewise, if I wanted to add a new button to the code cells I would do this with on_code_build. If I wanted to determine the names added when the cell evaluates, I would do so with on_code_evaluate.
directory extensions
The next type of extension is the Directory extension. Directories are one of the few extension types that Olive does not use in its Base. The only real bindings for the Directory on this front are build.
build(c::Connection, dir::Directory{<:Any}, m::Module)
To create a directory, the main thing we are going to need to provide is the Cell representation of files. Other than this, things are pretty open-ended and controls can be laid essentially however one might want them to be. The only other important dispatch for directories is work_preview.
work_preview(d::Directory{<:Any})
cell extensions
Cell extensions are probably the most complicated type of Olive extension -- aside from taking Olive apart and putting it back together again. There are two main types of Cell in Olive, these are file cells and session cells. The most essential of the functions to extend for cells is, as usual, build. A session Cell's dispatch takes a Connection, ComponentModifier, the Cell, and the Project.
build(c::Connection, cm::ComponentModifier, cell::Cell{<:Any}, proj::Project{<:Any})
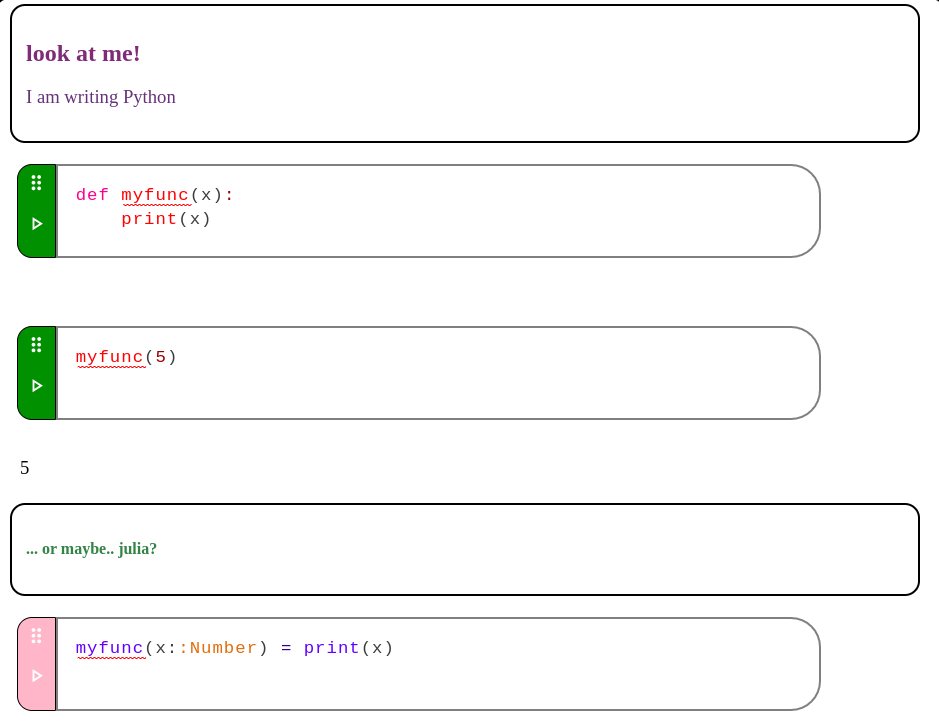
In these session cell dispatches, we have the ability to create a new method based on both the Project and the Cell. Here is an example from OlivePy, the python Cell. This build function is a great example because it builds a standard type of cell for code, with highlighting.
using Olive
using Olive.Toolips
using Olive.ToolipsSession
using Olive.ToolipsDefaults
using Olive.ToolipsMarkdown
using Olive.IPyCells
using PyCall
import Olive: build, evaluate, cell_highlight!, getname, olive_save, ProjectExport
import Base: string
using Olive: Project, Directory

function build(c::Connection, cm::ComponentModifier, cell::Cell{:python}, proj::Project{<:Any})
    tm = c[:OliveCore].client_data[getname(c)]["highlighters"]["python"]
    ToolipsMarkdown.clear!(tm)
    mark_python!(tm)
    builtcell::Component{:div} = Olive.build_base_cell(c, cm, cell,
    proj, sidebox = true, highlight = true)
    km = Olive.cell_bind!(c, cell, proj)
    interior = builtcell[:children]["cellinterior$(cell.id)"]
    sideb = interior[:children]["cellside$(cell.id)"]
    style!(sideb, "background-color" => "green")
    inp = interior[:children]["cellinput$(cell.id)"]
    inp[:children]["cellhighlight$(cell.id)"][:text] = string(tm)
    bind!(c, cm, inp[:children]["cell$(cell.id)"], km)
    builtcell::Component{:div}
end
Here I also use build_base_cell and cell_bind! to assist with building the cell. These give nice Olive base templates that are incredibly easy to work from. In addition to build, there are several other functions that can also be extended to change the functionality of the Cell. A full list of these is in the function reference. The main others we should worry about are evaluate, string, and cell_highlight. However, there are certainly some examples where cell_bind! has come in handy, such as this example from the Collaborators extension in OliveSession:
function cell_bind!(c::Connection, cell::Cell{<:Any},
    cells::Vector{Cell}, proj::Project{:rpc})
    keybindings = c[:OliveCore].client_data[Olive.getname(c)]["keybindings"]
    km = ToolipsSession.KeyMap()
    bind!(km, keybindings["save"], prevent_default = true) do cm::ComponentModifier
        Olive.save_project(c, cm, proj)
        rpc!(c, cm)
    end
    bind!(km, keybindings["up"]) do cm2::ComponentModifier
        Olive.cell_up!(c, cm2, cell, cells, proj)
        rpc!(c, cm2)
    end
    bind!(km, keybindings["down"]) do cm2::ComponentModifier
        Olive.cell_down!(c, cm2, cell, cells, proj)
        rpc!(c, cm2)
    end
    bind!(km, keybindings["delete"]) do cm2::ComponentModifier
        Olive.cell_delete!(c, cm2, cell, cells)
        rpc!(c, cm2)
    end
    bind!(km, keybindings["evaluate"]) do cm2::ComponentModifier
        Olive.evaluate(c, cm2, cell, cells, proj)
        rpc!(c, cm2)
    end
    bind!(km, keybindings["new"]) do cm2::ComponentModifier
        Olive.cell_new!(c, cm2, cell, cells, proj)
    end
    bind!(km, keybindings["focusup"]) do cm::ComponentModifier
        Olive.focus_up!(c, cm, cell, cells, proj)
    end
    bind!(km, keybindings["focusdown"]) do cm::ComponentModifier
        Olive.focus_down!(c, cm, cell, cells, proj)
    end
    km::KeyMap
end
In this case, I rewrote the default cell bind to work with rpc!, and this is as easy as writing one method -- also of note is that the Project dispatch is used to facilitate this. This means that this will change for every cell under that Project. The evaluate function does precisely that -- evaluates the cell. These are usually the most complicated functions in an extension.
project extensions
Project extensions are changes in functions based on projects. Olive file cells will open different types of files as different types of projects, and this allows us to change both how the project is built and how different cells behave in different projects. In other words, a :code cell could act as a normal Python code cell inside of a Project{:python}. We are able to extend projects using any of the Session cell functions:
build(::Connection, ::ComponentModifier, ::Cell{<:Any}, ::Project{<:Any})on_code_evaluate(::Connection, ::ComponentModifier, ::Cell{<:Any}, ::Project{<:Any})on_code_highlight(::Connection, ::ComponentModifier, ::Cell{<:Any}, ::Project{<:Any})on_code_build(::Connection, ::ComponentModifier, ::Cell{<:Any}, ::Project{<:Any})cell_bind!(::Connection, ::ComponentModifier, ::Cell{<:Any}, ::Project{<:Any})build_base_cell(::Connection, ::ComponentModifier, ::Cell{<:Any}, ::Project{<:Any})evaluate(::Connection, ::ComponentModifier, ::Cell{<:Any}, ::Project{<:Any})cell_highlight!(::Connection, ::ComponentModifier, ::Cell{<:Any}, ::Project{<:Any})
As well as the Project ones:
format extensions
One thing we are probably going to want for our project is the ability to read and write files. In some cases with Olive, this might an entirely new file type being read in an entirely new way. Adding new formats in Olive revolves primarily around the olive_save and olive_read functions. The first of these is olive_read, which takes only a file cell and returns a Vector{IPyCells.Cell}. olive_save, on the other hand, utilizes the ProjectExport{<:Any}. For example, here is the olive_save function in base Olive which denotes the standard Julia IPyCells Cell export:
function olive_save(cells::Vector{<:IPyCells.AbstractCell}, p::Project{<:Any},
    pe::ProjectExport{:jl})
    IPyCells.save(cells, p.data[:path])
    nothing
end
Note that, like in the case of session cells this may also be done with both the Project and the ProjectExport, so we could have a different type of project export completely differently in this way. We are also able to use create_new to add new project template types to create.
function create_new(c::Connection, cm::ComponentModifier, oe::OliveExtension{:newproj})

end
Creating the latter is not as easy as it should be (yet), as there are no important action functions created to quickly do this, but this will change in future versions of Olive.
function reference
A crucial component to Olive's parametric system for loading new features is Olive's methods and functions. Knowing these functions and how to write methods for them is absolutely vital for creating extensions. Below are a list of dispatches, of which any parameterized type (Project, Directory, Cell, OliveExtension, ProjectExport) from Olive can be replaced to extend this functionality for your own version of Olive!
session cell reference
build(::Connection, ::ComponentModifier, ::Cell{<:Any}, ::Project{<:Any})on_code_evaluate(::Connection, ::ComponentModifier, ::Cell{<:Any}, ::Project{<:Any})on_code_highlight(::Connection, ::ComponentModifier, ::Cell{<:Any}, ::Project{<:Any})on_code_build(::Connection, ::ComponentModifier, ::Cell{<:Any}, ::Project{<:Any})cell_bind!(::Connection, ::ComponentModifier, ::Cell{<:Any}, ::Project{<:Any})build_base_cell(::Connection, ::ComponentModifier, ::Cell{<:Any}, ::Project{<:Any})evaluate(::Connection, ::ComponentModifier, ::Cell{<:Any}, ::Project{<:Any})cell_highlight!(::Connection, ::ComponentModifier, ::Cell{<:Any}, ::Project{<:Any})string(::Cell{<:Any})
file cell reference
- `build(::Connection, ::Cell{<:Any}, ::Directory{<:Any})
build_base_cell(::Connection, ::Cell{<:Any}, ::Directory{<:Any})olive_save(::Cell{<:Any})olive_read(::Cell{<:Any})
project reference
source_module!(c::Connection, p::Project{<:Any}, name::String)check!(p::Project{<:Any})work_preview(c::Connection, p::Project{<:Any})open_project(c::Connection, cm::AbstractComponentModifier, proj::Project{<:Any}, tab::Component{:div})close_project(c::Connection, cm::ComponentModifier, proj::Project{<:Any})save_project(c::Connection, cm::ComponentModifier, proj::Project{<:Any})save_project_as(c::Connection, cm::ComponentModifier, proj::Project{<:Any})build_tab(c::Connection, p::Project{<:Any})style_tab_closed!(cm::ComponentModifier, proj::Project{<:Any})tab_controls(c::Connection, p::Project{<:Any})switch_pane!(c::Connection, cm::ComponentModifier, p::Project{<:Any})step_evaluate(c::Connection, cm::ComponentModifier, proj::Project{<:Any}, e::Int64 = 0)- sesssion cell bindings
- project export bindings
ProjectExport functions
olive_save(cells::Vector{<:IPyCells.AbstractCell}, p::Project{<:Any}, pe::ProjectExport{<:Any})
Directory functions
work_preview(d::Directory{<:Any})build(c::Connection, dir::Directory{<:Any}, m::Module)create_new!(c::Connection, cm::ComponentModifier, dir::Directory{<:Any}; directory::Bool = false)copy_file!(c::Connection, cm::ComponentModifier, dir::Directory{<:Any}, file::String)- file cell builds
OliveExtension functions
build(c::Connection, om::OliveModifier, oe::OliveExtension{<:Any})create_new(c::Connection, cm::ComponentModifier, oe::OliveExtension{<:Any})
important functions
containersectionbuilds a container with an expander.switch_work_dir!changes the workind directory of an environment.olive_notify!sends anOlivenotification.
UI reference
Olive is changed primarily by using ComponentModifiers to make changes to the Olive UI. For this, the pre-requisite knowledge is to know the IDs of different things you are working with. That being said, in order to work with all portions of Olive we will want to know how the UI is composed together.
topbar UI

session UI
explorer UI
cell UI

project UI
directory UI
Server reference
The thing about Olive is that the concept is very open. With Olive, we could effectively completely rebuild the main session ourselves in order to customize our Olive. This would be done by creating a new route with Toolips and manually composing session yourself. That being said, with some basic knowledge of the Toolips.WebServer it is relatively easy to do essentially anything we could want with our olive server.
examples
With so much information in the development of Olive extensions, it might be helpful to look at code from some examples. The most basic of these examples that might give a pretty idea of how extensions are built is OlivePy. This project provides Olive with Python cells and the ability to read .py files. This includes a file cell extension, a load extension, a session cell extension, and an olive_save extension.
Here is a link to several extensions. which are helpful for demonstrating writing them:
- OlivePy
loadsession cell,olive_save,file cell - OliveSession
loadProject,olive_save,session cell,Directory
deploying olive
Olive has a goal to be very deployable, but it is recommended to wait for 0.1.0 to deploy Olive. It is also recommended to add OliveSession; this provides a number of great features for multiple users, including better directory management, login screens, and sharable sessions.
status
In its current form, Olive would certainly need some things to be deployable. The main concern on this front is that the Julia session is active. There are simple ways to get around this -- removing portions of Base and Main from the scope of the module they have access to. As of the release of 0.0.9, OliveSession has not yet been completed, so this type of secure module is not really supported yet. That being said, Olive will be deployable, and for anyone wanting to create a server, the most optimal approach to doing so is probably using OliveSession. The project is certainly planned to fill this application, though -- so deployment will be very feasible in the near future. However, the goal is for this package to focus on the single-user experience while OliveSession focuses on the multi-user experience.
creating a server
Unless you are only sharing your olive with a limited number of people, you probably do not want this server to load from your home olive. That being said, it is really easy to create an olive at any path on your machine using the path key-word argument on start.
using Olive; Olive.start(path = ".")
This will give us an olive home directory inside of the provided URI. Inside of this directory, we can begin developing our module. From there, it is simply extending your Olive and manipulating it into being server-ready. Alternatively, start does not have to be used and you can load Olive by manually creating the olive server yourself. This is not entirely recommended, especially not for new users, primarily because there is no documentation on doing this. However, there is more information and a small write-up on this in olive servers
olive servers
The Olive.start function actually does not return Nothing, it returns a Toolips.WebServer.
help?> Toolips.WebServer
  WebServer <: ToolipsServer
  ––––––––––––––––––––––––––––

    •  host::String

    •  routes::Dict

    •  extensions::Dict

    •  server::Any

    •  add::Function

    •  remove::Function

    •  start::Function

  A web-server is given as a return from a ServerTemplate whenever ServerTemplate.start() is ran. It can be rerouted with route! and indexed similarly to
  the Connection, with Symbols representing extensions and Strings representing routes.

  example
  ⋅⋅⋅⋅⋅⋅⋅⋅⋅

  st = ServerTemplate()
  ws = st.start()
  routes(ws)
  ...
  extensions(ws)
  ...
  route!(ws, "/") do c::Connection
      write!(c, "hello")
  end
This is an introspectable server type that holds all of the data for your Olive session. From your Julia REPL, this can easily be introspected by accessing the extensions and routes.
oliveserver = Olive.start()

oliveserver[:OliveCore]
This also means that the routes of an Olive server could be changed, or rerouted in anyway -- really. All of the projects are stored within the OliveCore.open field, a Vector{Olive.Environment}.
olive session
A crucial project you are probably going to want to be aware of if you are planning to deploy Olive is OliveSession. This is an Olive extension provided to make Olive far more deployable and multi-user friendly. This project is still in the works, it is not recommended to deploy this current state of Olive. The modules need to limit access to Base functions, something base Olive is not intended to offer. This build of Olive is intended to primarily be focused on the single-computer experience, while still making Olive apply to that type of context in deployment and customized.
contributing
Olive is a complicated project, and there is a lot going on from merely Olive itself to the entire ecosystem that supports olive. That being said, community support is essential to improving this project. You may contribute to Olive by
- simply using olive
- creating extensions for olive
- sharing olive with your friends!
- starring olive
- forking olive
- submitting issues
- sponsoring ChifiSource creators (in each repo's sponsors section)
- participating in the community
I thank you for all of your help with our project, or just for considering contributing! I want to stress further that we are not picky -- allowing us all to express ourselves in different ways is part of the key methodology behind the entire chifi ecosystem. Feel free to contribute, we would love to see your art! Issues marked with good first issue might be a great place to start!
guidelines
When submitting issues or pull-requests for Olive, it is important to make sure of a few things. We are not super strict, but making sure of these few things will be helpful for maintainers!
- You have replicated the issue on
Olive#Unstable - The issue does not currently exist... or does not have a planned implementation different to your own. In these cases, please collaborate on the issue, express your idea and we will select the best choice.
- Pull Request TO UNSTABLE
- This is an issue with Olive, not a dependency; if there is a problem with highlighting, please report that issue to ToolipsMarkdown. If there is an issue with Cell reading/writing, report that issue to IPyCells
tech stack
I appreciate those who are interested to take some time to look into the tech-stack used to create this project. I created a lot of these, and it took a lot of time.
toolips packages
- Toolips - Base web-development framework.
- ToolipsSession - Fullstack callbacks.
- ToolipsMarkdown - Markdown interpolation, syntax highlighting.
- ToolipsDefaults - Default Components.
- ToolipsBase64 - Image types into Components -- for Olive display.
other packages