PlutoUI.jl

Essentials
Number inputs
Slider
NumberField
Scrubbable
# RangeSlider
String inputs
PlutoUI.TextField — Type.A text input (<input type="text">) - the user can type text, the text is returned as String via @bind.
If dims is a tuple (cols::Integer, row::Integer), a <textarea> will be shown, with the given dimensions
Use default to set the initial value.
See the Mozilla docs about <input type="text"> and <textarea>
Examples
@bind poem TextField()
@bind poem TextField((30,5); default="Hello JuliaCon!")
PlutoUI.PasswordField — Type.A password input (<input type="password">) - the user can type text, the text is returned as String via @bind.
This does not provide any special security measures, it just renders black dots (•••) instead of the typed characters.
Use default to set the initial value.
See the Mozilla docs about <input type="password">
Examples
@bind secret_poem PasswordField()
@bind secret_poem PasswordField(default="Te dansen omdat men leeft")
PlutoUI.ColorStringPicker — Type.A color input (<input type="color">) - the user can pick an RGB color, the color is returned as color hex String via @bind. The value is lowercase and starts with #.
Use default to set the initial value.
Examples
@bind color ColorStringPicker()
@bind color ColorStringPicker(default="#aabbcc")
See also
PlutoUI.DateField — Type.A date input (<input type="date">) - the user can pick a date, the date is returned as Dates.DateTime via @bind.
Use default to set the initial value.
See the Mozilla docs about <input type="date">
Examples
@bind best_day_of_my_live DateField()
@bind best_day_of_my_live DateField(default=today())
PlutoUI.TimeField — Type.A time input (<input type="time">) - the user can pick a time, the time is returned as String via @bind (e.g. "15:45"). Value is "" until a time is picked.
Use default to set the initial value.
See the Mozilla docs about <input type="time">
Examples
@bind lunch_time TimeField()
@bind lunch_time TimeField(default=now())
Selecting
PlutoUI.Radio — Type.A group of radio buttons - the user can choose one of the options, an array of Strings.
options can also be an array of pairs key::String => value::Any. The key is returned via @bind; the value is shown.
Examples
@bind veg Radio(["potato", "carrot"])
@bind veg Radio(["potato" => "🥔", "carrot" => "🥕"])
@bind veg Radio(["potato" => "🥔", "carrot" => "🥕"], default="carrot")
PlutoUI.Select — Type.Select(options::Vector; [default])
# or with a custom display value:
Select(options::Vector{Pair{Any,String}}; [default::Any])A dropdown menu - the user can choose an element of the options vector.
See MultiSelect for a version that allows multiple selected items.
Examples
@bind veg Select(["potato", "carrot"])@bind f Select([sin, cos, tan, sqrt])
f(0.5)You can also specify a display value by giving pairs bound_value => display_value:
@bind f Select([cos => "cosine function", sin => "sine function"])

f(0.5)
PlutoUI.MultiSelect — Type.MultiSelect(options::Vector; [default], [size::Int])
# or with a custom display value:
MultiSelect(options::Vector{Pair{Any,String}}; [default], [size::Int])A multi-selector - the user can choose one or more of the options.
See Select for a version that allows only one selected item.
Examples
@bind vegetables MultiSelect(["potato", "carrot"])

if "carrot" ∈ vegetables
	"yum yum!"
end
@bind chosen_functions MultiSelect([sin, cos, tan, sqrt])
[f(0.5) for f in chosen_functions]You can also specify a display value by giving pairs bound_value => display_value:
@bind chosen_functions MultiSelect([
	cos => "cosine function",
	sin => "sine function",
])

[f(0.5) for f in chosen_functions]
The size keyword argument may be used to specify how many rows should be visible at once.
@bind letters MultiSelect(string.('a':'z'), size=20)PlutoUI.MultiCheckBox — Type.MultiCheckBox(options::Vector; [default::Vector], [orientation ∈ [:row, :column]], [select_all::Bool])A group of checkboxes - the user can choose which of the options to return. The value returned via @bind is a list containing the currently checked items.
See also: MultiSelect.
options can also be an array of pairs key::Any => value::String. The key is returned via @bind; the value is shown.
Keyword arguments
defaultsspecifies which options should be checked initally.orientationspecifies whether the options should be arranged in:row's:column's.select_allspecifies whether or not to include a "Select All" checkbox.
Examples
@bind snacks MultiCheckBox(["🥕", "🐟", "🍌"]))

if "🥕" ∈ snacks
    "Yum yum!"
end
@bind functions MultiCheckBox([sin, cos, tan])
[f(0.5) for f in functions]@bind snacks MultiCheckBox(["🥕" => "🐰", "🐟" => "🐱", "🍌" => "🐵"]; default=["🥕", "🍌"])@bind animals MultiCheckBox(["🐰", "🐱" , "🐵", "🐘", "🦝", "🐿️" , "🐝", "🐪"]; orientation=:column, select_all=true)Clicky click
PlutoUI.CheckBox — Type.A checkbox to choose a Boolean value true/false.
Examples
@bind programming_is_fun CheckBox()
@bind julia_is_fun CheckBox(default=true)
md"Would you like the thing? $(@bind enable_thing CheckBox())"
PlutoUI.Button — Type.A button that sends back the same value every time that it is clicked.
You can use it to trigger reactive cells.
See also CounterButton to get the number of times the button was clicked.
Examples
In one cell:
@bind go Button("Go!")and in a second cell:
begin
	# reference the bound variable - clicking the button will run this cell
	go

	md"My favorite number is 0.35803664437216476!"
end
PlutoUI.CounterButton — Type.A button that sends back the number of times that it was clicked.
You can use it to trigger reactive cells.
Examples
In one cell:
@bind go CounterButton("Go!")and in a second cell:
begin
	# reference the bound variable - clicking the button will run this cell
	go

	md"My favorite number is 0.3534388479470003!"
end
PlutoUI.LabelButton — Type.A button that sends back the same value every time that it is clicked.
You can use it to trigger reactive cells.
See also CounterButton to get the number of times the button was clicked.
Examples
In one cell:
@bind go Button("Go!")and in a second cell:
begin
	# reference the bound variable - clicking the button will run this cell
	go

	md"My favorite number is 0.35803664437216476!"
end
Display helpers
PlutoUI.TableOfContents — Type.Generate Table of Contents using Markdown cells. Headers h1-h6 are used.
Keyword arguments:
title header to this element, defaults to "Table of Contents"
indent flag indicating whether to vertically align elements by hierarchy
depth value to limit the header elements, should be in range 1 to 6 (default = 3)
aside fix the element to right of page, defaults to true
Examples:
TableOfContents()

TableOfContents(title="Experiments 🔬")

TableOfContents(title="📚 Table of Contents", indent=true, depth=4, aside=true)
PlutoUI.br — Constant.Line break without creating a new paragraph. Useful inside the md" macro:
Example
md"""
Hello $br world!
"""
PlutoUI.Resource — Type.Resource(src::String, mime=mime_from_filename(src)[, html_attributes::Pair...])A container for a URL-addressed resource that displays correctly in rich IDEs.
Examples
Resource("https://julialang.org/assets/infra/logo.svg")Resource("https://interactive-examples.mdn.mozilla.net/media/examples/flower.webm", :width => 100)md"""
This is what a duck sounds like: $(Resource("https://interactive-examples.mdn.mozilla.net/media/examples/t-rex-roar.mp3"))
md"""PlutoUI.LocalResource — Function.Create a Resource for a local file (a base64 encoded data URL is generated).
WARNING
LocalResourcewill not work when you share the script/notebook with someone else, unless they have those resources at exactly the same location on their file system.
Recommended alternatives (images)
- Go to imgur.com and drag&drop the image to the page. Right click on the image, and select "Copy image location". You can now use the image like so:
PlutoUI.Resource("https://i.imgur.com/SAzsMMA.jpg"). - If your notebook is part of a git repository, place the image in the repository and use a relative path:
PlutoUI.LocalResource("../images/cat.jpg").
Examples
LocalResource("./cat.jpg")LocalResource("/home/fons/Videos/nijmegen.mp4", :width => 200)md"""
This is what a duck sounds like: $(LocalResource("../data/hannes.mp3"))
md"""Terminal addiction
PlutoUI.Print — Function.Print(xs...)The text that would be printed when calling print(xs...). Use string(xs...) if you want to use the result as a String.
See also: Dump and with_terminal.
PlutoUI.Dump — Type.Dump(x; maxdepth=8)Every part of the representation of a value. The depth of the output is truncated at maxdepth.
This is a variant of Base.dump that returns the representation directly, instead of printing it to stdout.
See also: Print and with_terminal.
PlutoUI.with_terminal — Function.with_terminal(f::Function; color::Bool=true, show_value::Bool=true)Run the function, and capture all messages to stdout. The result will be a small terminal displaying the captured text.
This allows you to to see the messages from println, dump, Pkg.status, etc.
Example:
with_terminal() do
    x=1+1
    println(x)
    @warn "Oopsie!"
end
with_terminal(show_value=false) do
@time x=sum(1:100000)
end with_terminal(dump, [1,2,[3,4]])See also PlutoUI.Dump.
Advanced IO control
Show
WithIOContext
# as_html
# as_mime
# as_png
# as_svg
# as_text
Special inputs
FilePicker
DownloadButton
# Clock
High-level components
PlutoUI.combine — Function.PlutoUI.combine(render_function::Function)Combine multiple input elements into one. The combined values are sent to @bind as a single tuple.
render_function is a function that you write yourself, take a look at the examples below.
Examples
🐶 & 🐱
We use the do syntax to write our render_function. The Child function is wrapped around each input, to let combine know which values to combine.
@bind values PlutoUI.combine() do Child
	md"""
	# Hi there!

	I have $(
		Child(Slider(1:10))
	) dogs and $(
		Child(Slider(5:100))
	) cats.

	Would you like to see them? $(Child(CheckBox(true)))
	"""
end

values == (1, 5, true) # (initially)
The output looks like:

🎏
The combine function is most useful when you want to generate your input elements dynamically. This example uses HypertextLiteral.jl for the @htl macro:
function wind_speeds(directions)
	PlutoUI.combine() do Child
		@htl("""
		<h6>Wind speeds</h6>
		<ul>
		$([
			@htl("<li>$(name): $(Child(Slider(1:100)))</li>")
			for name in directions
		])
		</ul>
		""")
	end
end

@bind speeds wind_speeds(["North", "East", "South", "West"])

speeds == (1, 1, 1, 1) # (initially)

# after moving the sliders:
speeds == (100, 36, 73, 60)
The output looks like:
Named variant
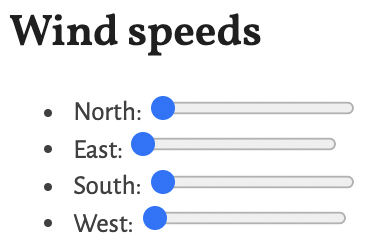
In the last example, we used Child to wrap around contained inputs:
Child(Slider(1:100))We can also use the named variant, which looks like:
Child("East", Slider(1:100))When you use the named variant for all children, the bound value will be NamedTuple, instead of a Tuple.
Let's rewrite our example to use the named variant:
function wind_speeds(directions)
	PlutoUI.combine() do Child
		@htl("""
		<h6>Wind speeds</h6>
		<ul>
		$([
			@htl("<li>$(name): $(Child(name, Slider(1:100)))</li>")
			for name in directions
		])
		</ul>
		""")
	end
end

@bind speeds wind_speeds(["North", "East", "South", "West"])

speeds == (North=1, East=1, South=1, West=1) # (initially)

# after moving the sliders:
speeds == (North=100, East=36, South=73, West=60)

md"The Eastern wind speed is $(speeds.East)."
The output looks like:
Why?
You can make a new widget!
You can use combine to create a brand new widget yourself, by combining existing ones!
In the example above, we created a new widget called wind_speeds. You could put this function in a package (e.g. WeatherUI.jl) and people could use it like so:
import WeatherUI: wind_speeds

@bind speeds wind_speeds(["North", "East"])
In other words: you can use combine to create application-specific UI elements, and you can put those in your package!
Difference with repeated @bind
The standard way to combine multiple inputs into one output is to use @bind multiple times. Our initial example could more easily be written as:
md"""
# Hi there!

I have $(@bind num_dogs Slider(1:10)) dogs and $(@bind num_cats Slider(5:10)) cats.

Would you like to see them? $(@bind want_to_see CheckBox(true))
"""
The combine function is useful when you are generating inputs dynamically, like in our second example. This is useful when:
- The number of parameters is very large, and you don't want to write
@bind parameter1 ...,@bind parameter2 ..., etc. - The number of parameters is dynamic! For example, you can load in a table in one cell, and then use
combinein another cell to select which rows you want to use.
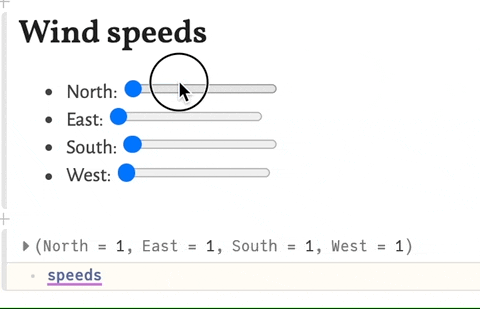
PlutoUI.confirm — Function.confirm(element::Any)Normally, when you move a Slider or type in a TextField, all intermediate values are sent back to @bind.
By wrapping an input element in confirm, you get a button to manually control when the value is sent, intermediate updates are hidden from Pluto.
One case where this is useful is a notebook that does a long computation based on a @bind input.
Examples
@bind x confirm(Slider(1:100))

x == 1 # (initially)
Now, when you move the slider, nothing happens, until you click the "Confirm" button, and x is set to the new slider value.
The result looks like:

See also
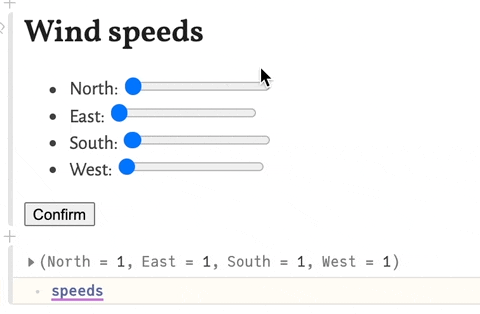
You can combine this with PlutoUI.combine!
@bind speeds confirm(
	combine() do Child
		@htl("""
		<h3>Wind speeds</h3>
		<ul>
		$([
			@htl("<li>$(name): $(Child(name, Slider(1:100)))")
			for name in ["North", "East", "South", "West"]
		])
		</ul>
		""")
	end
)
The result looks like: