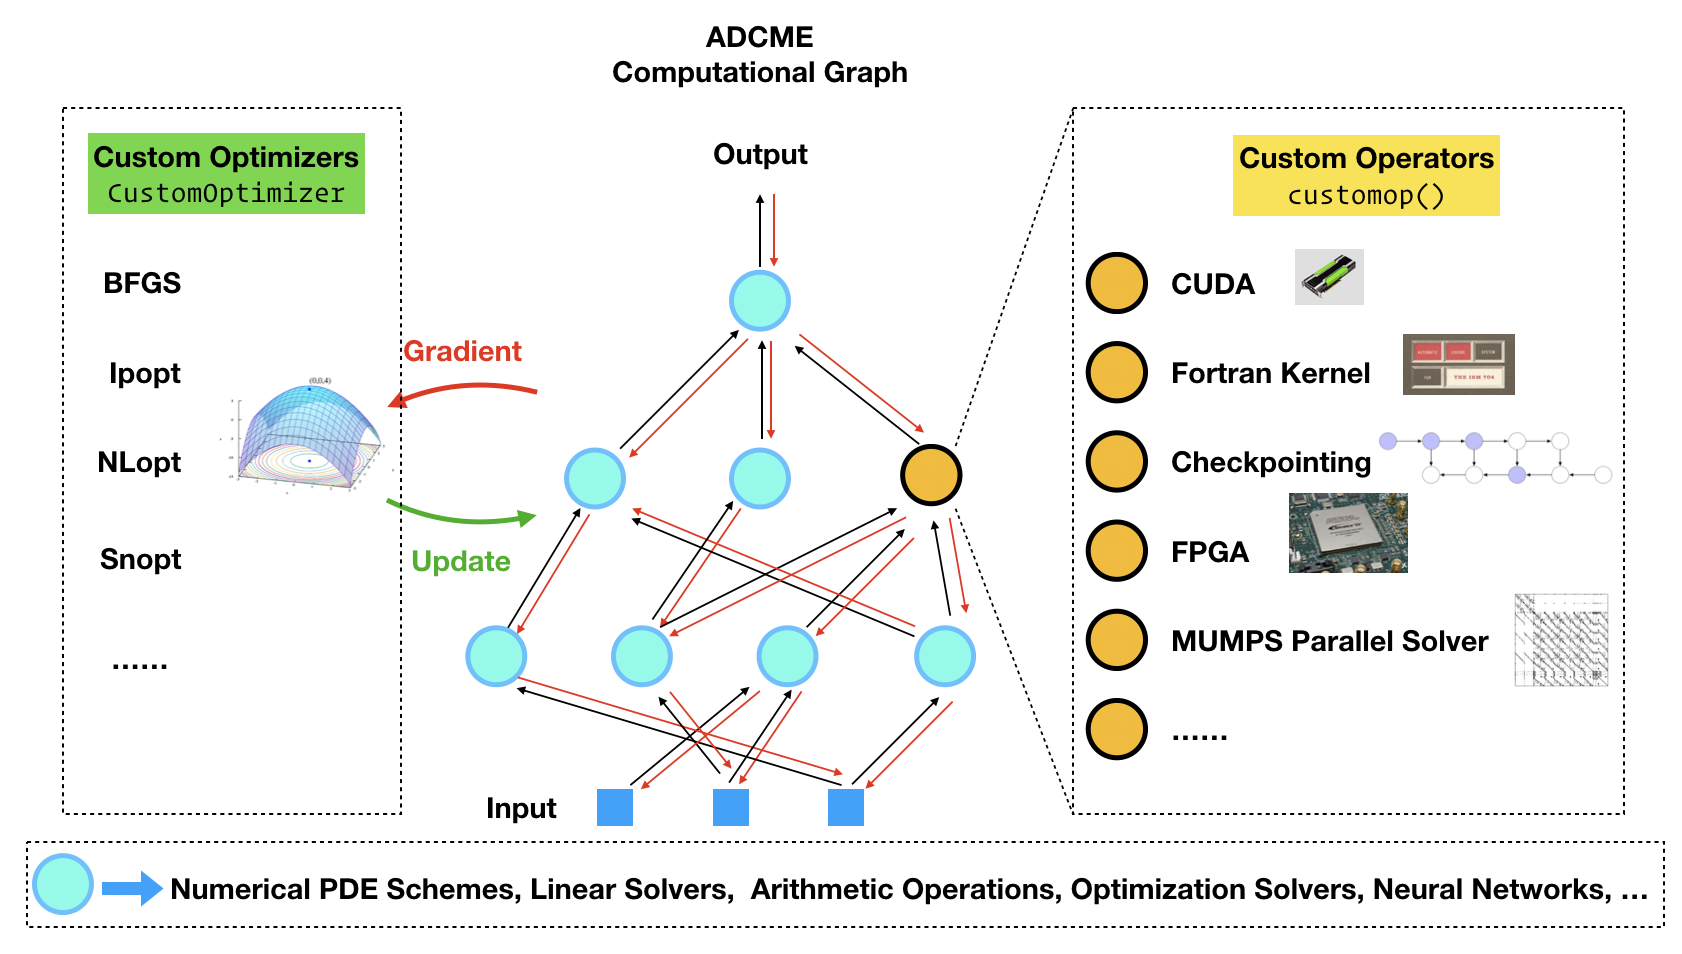
Advanced: Custom Operators
As a reminder, there are many built-in custom operators in deps/CustomOps and they are good resources for understanding custom operators. The following is a step-by-step instruction on how custom operators are implemented.
The Need for Custom Operators
Custom operators are ways to add missing features or improve performance critical components in ADCME. Typically users do not have to worry about custom operators and performance of prototypes is in general pretty good. However, in the following situation custom opreators might be very useful
- Direct implementation in ADCME is inefficient, e.g., vectorizing some codes is difficult.
- There are legacy codes users want to reuse, such as Fortran libraries.
- Special acceleration techniques, such as checkpointing scheme, MPI-enabled linear solvers, and FPGA/GPU-accelerated codes.
Build Custom Operators
In the following, we present an example of implementing a sparse solver for $Au=b$ as a custom operator.
Input: row vector ii, column vectorjj and value vector vv for the sparse coefficient matrix $A$; row vector kk and value vector ff for the right hand side $b$; the coefficient matrix dimension is $d\times d$
Output: solution vector $u\in \mathbb{R}^d$
Step 1: Create and modify the template file
The following command helps create the wrapper
customop()There will be a custom_op.txt in the current directory. Modify the template file
MySparseSolver
int32 ii(?)
int32 jj(?)
double vv(?)
int32 kk(?)
double ff(?)
int32 d()
double u(?) -> output
The first line is the name of the operator. It should always be in the camel case.
The 2nd to the 7th lines specify the input arguments, the signature is type+variable name+shape. For the shape, () corresponds to a scalar, (?) to a vector and (?,?) to a matrix. The variable names must be in lower cases. Additionally, the supported types are: int32, int64, float, double, bool and string.
The last line is the output, denoted by -> output (do not forget the whitespace before and after ->).
If there are non-real type outputs, the corresponding top gradients input to the gradient kernel should be removed.
Step 2: Implement the kernels
Run customop() again and there will be CMakeLists.txt, gradtest.jl, MySparseSolver.cpp appearing in the current directory. MySparseSolver.cpp is the main wrapper for the codes and gradtest.jl is used for testing the operator and its gradients. CMakeLists.txt is the file for compilation.
Create a new file MySparseSolver.h and implement both the forward simulation and backward simulation (gradients)
#include <eigen3/Eigen/Sparse>
#include <eigen3/Eigen/SparseLU>
#include <vector>
#include <iostream>
using namespace std;
typedef Eigen::SparseMatrix<double> SpMat; // declares a column-major sparse matrix type of double
typedef Eigen::Triplet<double> T;

SpMat A;

void forward(double *u, const int *ii, const int *jj, const double *vv, int nv, const int *kk, const double *ff,int nf,  int d){
    vector<T> triplets;
    Eigen::VectorXd rhs(d); rhs.setZero();
    for(int i=0;i<nv;i++){
      triplets.push_back(T(ii[i]-1,jj[i]-1,vv[i]));
    }
    for(int i=0;i<nf;i++){
      rhs[kk[i]-1] += ff[i];
    }
    A.resize(d, d);
    A.setFromTriplets(triplets.begin(), triplets.end());
    auto C = Eigen::MatrixXd(A);
    Eigen::SparseLU<SpMat> solver;
    solver.analyzePattern(A);
    solver.factorize(A);
    auto x = solver.solve(rhs);
    for(int i=0;i<d;i++) u[i] = x[i];
}

void backward(double *grad_vv, const double *grad_u, const int *ii, const int *jj, const double *u, int nv, int d){
    Eigen::VectorXd g(d);
    for(int i=0;i<d;i++) g[i] = grad_u[i];
    auto B = A.transpose();
    Eigen::SparseLU<SpMat> solver;
    solver.analyzePattern(B);
    solver.factorize(B);
    auto x = solver.solve(g);
    // cout << x << endl;
    for(int i=0;i<nv;i++) grad_vv[i] = 0.0;
    for(int i=0;i<nv;i++){
      grad_vv[i] -= x[ii[i]-1]*u[jj[i]-1];
    }
}In this implementation we have used Eigen library for solving sparse matrix. Other choices are also possible, such as algebraic multigrid methods. Note here for convenience we have created a global variable SpMat A;. This is not recommend if you want to run the code concurrently, since the variable A must be overwritten by another concurrent thread.
Step 3: Compile
It is recommended that you use the cmake, make and gcc provided by ADCME. The binary locations can be found via
| Variable | Description |
|---|---|
ADCME.CXX | C++ Compiler |
ADCME.CC | C Compiler |
ADCME.TFLIB | libtensorflow_framework.so location |
ADCME.CMAKE | Cmake binary location |
ADCME.MAKE | Make binary location |
ADCME will properly handle the environment variable for you. So we always recommend you to compile custom operators using ADCME functions:
First cd into your custom operator director (where CMakeLists.txt is located), create a directory build if it doesn't exist, cd into build, and do
julia> using ADCME
julia> ADCME.cmake()
julia> ADCME.make()
Based on your operation system, you will create libMySparseSolver.{so,dylib,dll}. This will be the dynamic library to link in TensorFlow.
Step 4: Test
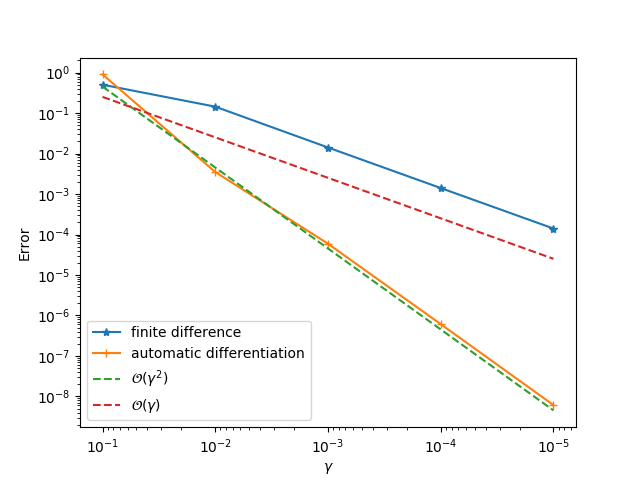
Finally, you could use gradtest.jl to test the operator and its gradients (specify appropriate data in gradtest.jl first). If you implement the gradients correctly, you will be able to obtain first order convergence for finite difference and second order convergence for automatic differentiation. Note you need to modify this file first, e.g., creating data and modifying the function scalar_function.
If the process fails, it is most probable the GCC compiler is not compatible with which was used to compile libtensorflow_framework.{so,dylib}. ADCME downloads a GCC compiler via Conda for you. However, if you follow the above steps but encounter some problems, we are happy to resolve the compatibility issue and improve the robustness of ADCME. Submitting an issue is welcome.
Build GPU Custom Operators
Install GPU-enabled TensorFlow (Linux and Windows)
To use CUDA in ADCME, we need to install a GPU-enabled version of TensorFlow. In ADCME, this is achieved by simply rebuilding ADCME with GPU environment variabe.
using Pkg
ENV["GPU"] = 1
Pkg.build("ADCME")
This will install all GPU dependencies.
Building a GPU custom operator
We consider a toy example where the custom operator is a function $f: x\rightarrow 2x$. To begin with, we create a custom_op.txt via customp
GpuTest
double a(?)
double b(?) -> output
Next, by running customp() again several template files are generated. We can then do the implementation in those files
GpuTest.cpp
#include "tensorflow/core/framework/op_kernel.h"
#include "tensorflow/core/framework/tensor_shape.h"
#include "tensorflow/core/platform/default/logging.h"
#include "tensorflow/core/framework/shape_inference.h"
#include<cmath>

// Signatures for GPU kernels here
void return_double(int n, double *b, const double*a);
using namespace tensorflow;


REGISTER_OP("GpuTest")

.Input("a : double")
.Output("b : double")
.SetShapeFn([](::tensorflow::shape_inference::InferenceContext* c) {

        shape_inference::ShapeHandle a_shape;
        TF_RETURN_IF_ERROR(c->WithRank(c->input(0), 1, &a_shape));

        c->set_output(0, c->input(0));
    return Status::OK();
  });

REGISTER_OP("GpuTestGrad")

.Input("grad_b : double")
.Input("b : double")
.Input("a : double")
.Output("grad_a : double");


class GpuTestOpGPU : public OpKernel {
private:

public:
  explicit GpuTestOpGPU(OpKernelConstruction* context) : OpKernel(context) {

  }

  void Compute(OpKernelContext* context) override {
    DCHECK_EQ(1, context->num_inputs());


    const Tensor& a = context->input(0);


    const TensorShape& a_shape = a.shape();


    DCHECK_EQ(a_shape.dims(), 1);

    // extra check

    // create output shape
    int n = a_shape.dim_size(0);
    TensorShape b_shape({n});

    // create output tensor

    Tensor* b = NULL;
    OP_REQUIRES_OK(context, context->allocate_output(0, b_shape, &b));

    // get the corresponding Eigen tensors for data access

    auto a_tensor = a.flat<double>().data();
    auto b_tensor = b->flat<double>().data();

    // implement your forward function here

    // TODO:
    return_double(n, b_tensor, a_tensor);

  }
};
REGISTER_KERNEL_BUILDER(Name("GpuTest").Device(DEVICE_GPU), GpuTestOpGPU);
GpuTest.cu
#define GOOGLE_CUDA 1
#define EIGEN_USE_GPU

#include "tensorflow/core/framework/register_types.h"
#include "tensorflow/core/framework/tensor_types.h"
#include "tensorflow/core/util/gpu_kernel_helper.h"

__global__ void return_double_(int n, double *b, const double*a){
    int i = blockIdx.x * blockDim.x + threadIdx.x;
    if (i<n) b[i] = 2*a[i];
}

void return_double(int n, double *b, const double*a){
    return_double_<<<(n+255)/256, 256>>>(n, b, a);
}
CMakeLists.txt
cmake_minimum_required(VERSION 3.5)
project(TF_CUSTOM_OP)
set (CMAKE_CXX_STANDARD 11)

execute_process(COMMAND julia -e "import ADCME; print(ADCME.__STR__)" OUTPUT_VARIABLE JL_OUT)
execute_process(COMMAND which julia OUTPUT_VARIABLE JULIA_BIN)
message("Julia=${JULIA_BIN}")

list(GET JL_OUT 0 BINDIR)
list(GET JL_OUT 1 LIBDIR)
list(GET JL_OUT 2 TF_INC)
list(GET JL_OUT 3 TF_ABI)
list(GET JL_OUT 4 EIGEN_INC)
list(GET JL_OUT 5 CC)
list(GET JL_OUT 6 CXX)
list(GET JL_OUT 7 CMAKE)
list(GET JL_OUT 8 MAKE)
list(GET JL_OUT 9 GIT)
list(GET JL_OUT 10 PYTHON)
list(GET JL_OUT 11 TF_LIB_FILE)
list(GET JL_OUT 12 LIBCUDA)
list(GET JL_OUT 13 CUDA_INC)

message("Python path=${PYTHON}")
message("EIGEN_INC=${EIGEN_INC}")
message("TF_INC=${TF_INC}")
message("TF_ABI=${TF_ABI}")
message("TF_LIB_FILE=${TF_LIB_FILE}")


if (CMAKE_CXX_COMPILER_VERSION VERSION_GREATER 5.0 OR CMAKE_CXX_COMPILER_VERSION VERSION_EQUAL 5.0)
  set(CMAKE_CXX_FLAGS "-D_GLIBCXX_USE_CXX11_ABI=${TF_ABI} ${CMAKE_CXX_FLAGS}")
endif()

set(CMAKE_BUILD_TYPE Release)
set(CMAKE_CXX_FLAGS_RELEASE "-O3 -DNDEBUG")

include_directories(${TF_INC} ${EIGEN_INC} ${CUDA_INC})
link_directories(${LIBDIR})

find_package(CUDA QUIET REQUIRED)
set(CMAKE_CXX_FLAGS "-std=c++11 ${CMAKE_CXX_FLAGS}")
set(CMAKE_CXX_FLAGS "-O3 ${CMAKE_CXX_FLAGS}")
set(CMAKE_CXX_FLAGS "-shared ${CMAKE_CXX_FLAGS}")
set(CMAKE_CXX_FLAGS "-fPIC ${CMAKE_CXX_FLAGS}")
set(CUDA_NVCC_FLAGS ${CUDA_NVCC_FLAGS};--expt-relaxed-constexpr)
SET(CUDA_PROPAGATE_HOST_FLAGS ON)

add_definitions(-DGOOGLE_CUDA)
message("Compiling GPU-compatible custom operator!")
cuda_add_library(GpuTest SHARED GpuTest.cpp GpuTest.cu)


set_property(TARGET GpuTest PROPERTY POSITION_INDEPENDENT_CODE ON)
target_link_libraries(GpuTest ${TF_LIB_FILE})
file(MAKE_DIRECTORY ${CMAKE_CURRENT_SOURCE_DIR}/build)
set_target_properties(GpuTest PROPERTIES LIBRARY_OUTPUT_DIRECTORY ${CMAKE_CURRENT_SOURCE_DIR}/build)
We can then compile the operator on a system where nvcc is available:
mkdir("build")
cd("build")
ADCME.cmake()
ADCME.make()
Running a GPU custom operator
We can now run a GPU operator by loading the shared library
using ADCME

function gpu_test(a)
    gpu_test_ = load_op_and_grad("$(@__DIR__)/build/libGpuTest","gpu_test")
    a = convert_to_tensor([a], [Float64]); a = a[1]
    gpu_test_(a)
end

# TODO: specify your input parameters
a = [1.0;3.0;-1.0]
u = gpu_test(a)
sess = Session(); init(sess)
run(sess, u)
If we run the file on a system without GPU resources, we will get the following error
<class 'tensorflow.python.framework.errors_impl.InvalidArgumentError'>If we have GPU resources, the kernel will run correctly with the output
2.0
6.0
-2.0
Miscellany
Mutable Inputs
Sometimes we want to modify tensors in place. In this case we can use mutable inputs. Mutable inputs must be Variable and it must be forwarded to one of the output. We consider implement a my_assign operator, with signature
my_assign(u::PyObject, v::PyObject)::PyObjectHere u is a Variable and we copy the data from v to u. In the MyAssign.cpp file, we modify the input and output specifications to
.Input("u : Ref(double)")
.Input("v : double")
.Output("w : Ref(double)")
In addition, the input tensor is obtained through
Tensor u = context->mutable_input(0, true);The second argument lock_held specifies whether the input mutex is acquired (false) before the operation. Note the output must be a Tensor instead of a reference.
To forward the input, use
context->forward_ref_input_to_ref_output(0,0);We use the following code snippet to test the program
my_assign = load_op("./build/libMyAssign","my_assign")
u = Variable([0.1,0.2,0.3])
v = constant(Array{Float64}(1:3))
u2 = u^2
w = my_assign(u,v)
sess = tf.Session()
init(sess)
@show run(sess, u)
@show run(sess, u2)
@show run(sess, w)
@show run(sess, u2)
The output is
[0.1,0.2,0.3]
[0.1,0.04,0.09]
[1.0,2.0,3.0]
[1.0,4.0,9.0]
We can see that the tensors depending on u are also aware of the assign operator. The complete programs can be downloaded here: CMakeLists.txt, MyAssign.cpp, gradtest.jl.
Third-party Plugins
ADCME also allows third-party custom operators hosted on Github. To build your own custom operators, implement your own custom operators in a Github repository. The root directory of the repository should have the following files
formula.txt, which tells how ADCME should interact with the custom operator. It is a Julia Pair, which has the formatsignature => (source_directory, library_name, signature, has_gradient)For example
"ot_network"=>("OTNetwork", "libOTNetwork", "ot_network", true)CMakeLists.txt, which is used for compiling the library.
Users are free to arrange other source files or other third-party libraries.
Upon using those libraries in ADCME, users first download those libraries to deps directory via
install("https://github.com/ADCMEMarket/OTNetwork")The official plugins are hosted on https://github.com/ADCMEMarket. To get access to the custom operators in ADCME, use
op = load_system_op("OTNetwork")- https://on-demand.gputechconf.com/ai-conference-2019/T1-3Minseok%20LeeAdding%20custom%20CUDA%20C++%20Operations%20in%20Tensorflow%20for%20boosting%20BERT%20Inference.pdf)
Batch Build
At some point, you might have a lot of custom operators. Building one-by-one will take up too much time. To reduce the building time, you might want to build all the operators all at once concurrently. To this end, you can consider batch build by using a common CMakeLists.txt. The commands in the CMakeLists.txt are the same as a typical custom operator, except that the designated libraries are different
# ... The same as a typical CMake script ...

# Specify all the library paths and library names.
set(LIBDIR_NAME VolumetricStrain ComputeVel DirichletBd
    FemStiffness FemStiffness1 SpatialFemStiffness
    SpatialVaryingTangentElastic Strain Strain1
    StrainEnergy StrainEnergy1)
set(LIB_NAME VolumetricStrain ComputeVel DirichletBd
    FemStiffness UnivariateFemStiffness SpatialFemStiffness
    SpatialVaryingTangentElastic StrainOp StrainOpUnivariate
    StrainEnergy StrainEnergyUnivariate)

# Copy and paste the following lines (no modification is required)
list(LENGTH "LIBDIR_NAME" LIBLENGTH)
message("Total number of libraries to make: ${LIBLENGTH}")
MATH(EXPR LIBLENGTH "${LIBLENGTH}-1")
foreach(IDX RANGE 0 ${LIBLENGTH})
  list(GET LIBDIR_NAME ${IDX} _LIB_DIR)
  list(GET LIB_NAME ${IDX} _LIB_NAME)
  message("Compiling ${IDX}th library: ${_LIB_DIR}==>${_LIB_NAME}")
  file(MAKE_DIRECTORY ${_LIB_DIR}/build)
  add_library(${_LIB_NAME} SHARED ${_LIB_DIR}/${_LIB_NAME}.cpp)
  set_property(TARGET ${_LIB_NAME} PROPERTY POSITION_INDEPENDENT_CODE ON)
  set_target_properties(${_LIB_NAME} PROPERTIES LIBRARY_OUTPUT_DIRECTORY ${CMAKE_SOURCE_DIR}/${_LIB_DIR}/build)
  target_link_libraries(${_LIB_NAME} ${TF_LIB_FILE})
endforeach(IDX)
Troubleshooting
Here are some common errors you might encounter during custom operator compilation:
Q: The cmake output for the Julia path is empty.
Julia=A: Check whether which julia outputs the Julia location you are using.
Q: The cmake output for Python path, Eigen path, etc., is empty.
Python path=
EIGEN_INC=
TF_INC=
TF_ABI=
TF_LIB_FILE=
A: Update ADCME to the latest version and check whether or not the ADCME compiler string is empty
using ADCME
ADCME.__STR__
Q: Julia package precompilation errors that seem not linked to ADCME.
A: Remove the corresponding packages using using Pkg; Pkg.rm(XXX) and reinstall those packages.
Q: Precompilation error linked to ADCME
ERROR: LoadError: ADCME is not properly built; run `Pkg.build("ADCME")` to fix the problem.A: Build ADCME using Pkg.build("ADCME"). Exit Julia and open Julia again. Check whether deps.jl exists in the deps directory of your Julia package (optional).