Requirements
GenX currently exists in version 0.3.5 and runs only on Julia v1.5.x, 1.6.x, 1.7.x, 1.8.x, and 1.9.x, where x>=0 and a minimum version of JuMP v1.1.1. We recommend the users to either stick to a particular version of Julia to run GenX. If however, the users decide to switch between versions, it's very important to delete the old Manifest.toml file and do a fresh build of GenX when switching between Julia versions. For those users who has previously cloned GenX, and has been running it successfully so far, and therefore might be unwilling to run it on the latest version of Julia: please look into the GitHub branch, old_version. It is currently setup to use one of the following open-source freely available solvers: (A) the default solver: HiGHS for linear programming and MILP, (B) Clp for linear programming (LP) problems, (C) Cbc for mixed integer linear programming (MILP) problems We also provide the option to use one of these two commercial solvers: (D) Gurobi, or (E) CPLEX. Note that using Gurobi and CPLEX requires a valid license on the host machine. There are two ways to run GenX with either type of solver options (open-source free or, licensed commercial) as detailed in the section, Running an Instance of GenX.
The file Project.toml in the parent directory lists all of the packages and their versions needed to run GenX. You can see all of the packages installed in your Julia environment and their version numbers by running pkg> status on the package manager command line in the Jula REPL.
Documentation
Detailed documentation for GenX can be found here. It includes details of each of GenX's methods, required and optional input files, and outputs. Interested users may also want to browse through prior publications that have used GenX to understand the various features of the tool.
Running an Instance of GenX
- Download or clone the GenX repository on your machine.
For this tutorial it will be assumed to be within your home directory: /home/youruser/GenX.
Creating the Julia environment and installing dependencies
Start a terminal and navigate into the
GenXfolder.Type
julia --project=.to start an instance of thejuliakernel with theprojectset to the current folder. The.indicates the current folder. On Windows the location of Julia can also be specified as e.g., 'C:\julia-1.6.0\bin\julia.exe –project=.'If it's your first time running GenX (or, if you have pulled after some major upgrades/release/version) execute steps 3-6.
Type
]to bring up the package system(GenX) pkg >prompt. This indicates that the GenX project was detected. If you see(@v1.6) pkg>as the prompt, then theprojectwas not successfully set.Type
instantiatefrom the(GenX) pkgprompt. On Windows there is an issue with the prepopulated MUMPSseqjll v5.5.1 that prevents compilation of the solvers. To avoid this issue type 'add MUMPSseqjll@5.4.1' after running instantiate.Type
stto check that the dependecies have been installed. If there is no error, it has been successful.Type the back key to come back to the
julia>prompt.These steps can be skipped on subsequent runs.
Steps 2-5 are shown in Figure 1 and Steps 6-8 are shown in Figure 2.
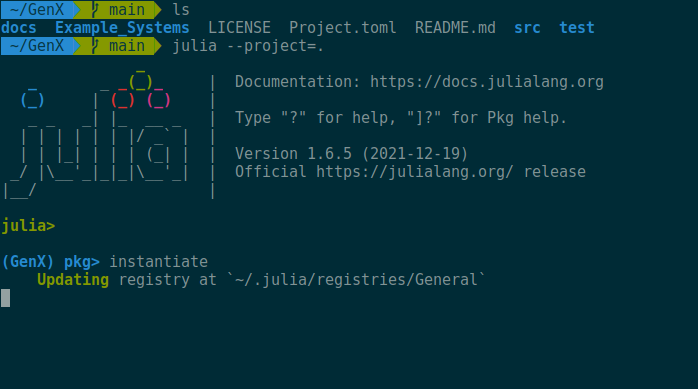 Figure 1. Creating the Julia environment and installing dependencies from Project.toml file from inside the GenX folder: Steps 2-5
Since we have already started Julia, we can run a case by executing the command
julia> include(“<path to your case>/Run.jl”).
For example, in order to run the OneZone case within the Example_Systems/SmallNewEngland folder, type include("Example_Systems/SmallNewEngland/OneZone/Run.jl") from the julia> prompt.
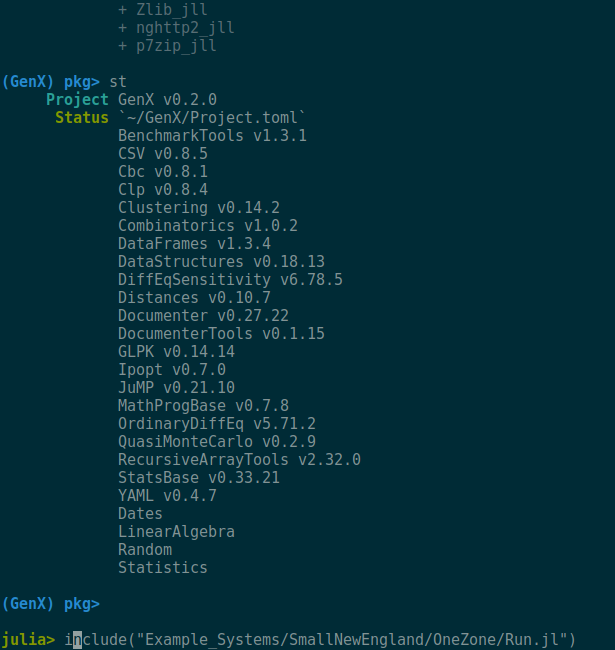 Figure 2. Creating the Julia environment and installing dependencies from Project.toml file from inside the GenX folder: Steps 6-8
After the script runs to completion, results will be written to a folder called “Results”, located in the same directory as Run.jl.
Running a case
Once Steps 1-6 have been performed, a case can be run from the terminal in a single line. There's no need to be in a certain folder to run a case, but it is required to point julia to the project that you created.
For example, from inside the GenX folder: /home/youruser/GenX > julia --project=. /home/youruser/GenX/Example_Systems/SmallNewEngland/OneZone/Run.jl
Or from another folder
/arbitrary/location > julia --project="/home/youruser/GenX" /home/youruser/GenX/Example_Systems/SmallNewEngland/OneZone/Run.jl
In fact, a best practice is to place your cases outside of the GenX repository:
/arbitrary/location > julia --project="/home/youruser/GenX" /your/custom/case/Run.jl
What happens when you run a case
The Run.jl file in each of the example systems calls a function run_genx_case!("path/to/case") which is suitable for capacity expansion modeling of several varieties. The following are the main steps performed in that function:
- Establish path to environment setup files and GenX source files.
- Read in model settings
genx_settings.ymlfrom the example directory. - Configure solver settings.
- Load the model inputs from the example directory and perform time-domain clustering if required.
- Generate a GenX model instance.
- Solve the model.
- Write the output files to a specified directory.
If your needs are more complex, it is possible to use a customized run script in place of simply calling run_genx_case!; the contents of that function could be a starting point.
Using commercial solvers: Gurobi or CPLEX
If you want to use the commercial solvers Gurobi or CPLEX:
- Make sure you have a valid license and the actual solvers for either of Gurobi or CPLEX installed on your machine
- Add Gurobi or CPLEX to the Julia Project.
> julia --project=/home/youruser/GenX

julia> <press close-bracket ] to access the package manager>
(GenX) pkg> add Gurobi
-or-
(GenX) pkg> add CPLEX- At the beginning of the
GenX/src/GenX.jlfile, uncommentusing Gurobiand/orusing CPLEX. - Set the appropriate solver in the
genx_settings.ymlfile of your case
Note that if you have not already installed the required Julia packages or you do not have a valid Gurobi license on your host machine, you will receive an error message and Run.jl will not run to completion.
Running Modeling to Generate Alternatives with GenX
GenX includes a modeling to generate alternatives (MGA) package that can be used to automatically enumerate a diverse set of near cost-optimal solutions to electricity system planning problems. To use the MGA algorithm, user will need to perform the following tasks:
- Add a
Resource_Typecolumn in theGenerators_data.csvfile denoting the type of each technology. - Add a
MGAcolumn in theGenerators_data.csvfile denoting the availability of the technology. - Set the
ModelingToGenerateAlternativesflag in theGenX_Settings.ymlfile to 1. - Set the
ModelingtoGenerateAlternativeSlackflag in theGenX_Settings.ymlfile to the desirable level of slack. - Create a
Rand_mga_objective_coefficients.csvfile to provide random objective function coefficients for each MGA iteration.
For each iteration, number of rows in the Rand_mga_objective_coefficients.csv file represents the number of distinct technology types while number of columns represent the number of model zones.
- Solve the model using
Run.jlfile.
Results from the MGA algorithm would be saved in MGA_max and MGA_min folders in the Example_Systems/ folder.
Additional method for running GenX cases
Added in 0.3.4
The GenX module exports a function called run_genx_case!. This function is designed to be used in a script; in fact it is used in each Run.jl file. If one wants to run multiple GenX cases in sequence, this can be especially useful, as GenX needs only to be compiled by Julia once, and can be somewhat faster.
Start julia pointed at the appropriate Project, and then proceed as follows:
> julia --project=/home/youruser/GenX

julia> using GenX

julia> run_genx_case!("/path/to/case")
All output will be written in that case's folder, as usual.